As our next rotation, we are going to learn the basics and the principles of traditional animation. We are going to cover up animation techniques like “Straight Ahead, Pose to Pose etc..”. For this rotation, we are going to use the tools “Lightbox” and “Pegbars”.
I am really excited about this rotation because I’ll learn new techniques about traditional animation and learn how to use the tool “Lightbox”.
Different Types of Animation Techniques
While listening to the brief, I have learned that there are 12 principles of animation. But because it is our introduction study we are only going to touch upon 3 of them. These are;
Straight ahead and pose to pose animation
Timing and spacing(bounding objects) and ease out & ease in
Walk cycle + Head turn
Straight Ahead Technique
First of all, we have covered the “Straight ahead” animation technique. It is basically frame by frame animation. It is also regarded as the traditional animation technique, but it takes a lot of effort and time to complete.
Regarding our first exercise, we are aimed to create a “Straight Ahead” animation which will last for about 2-3 seconds and contain 25 frames. As for my initial thoughts, I wasn’t very sure about what to come up with in the first place. Then, after watching our tutor’s tutorial I have decided to create an iteration of his fluid animation example. For this exercise, I haven’t used the paper but used my Ipad since I haven’t got my Lightbox yet.
As for my fluid animation practice, I have drawn 25 frames of fluid shapes which starts off as a whole and then splits up at a point and then gets back as a whole at the end. The creation of this practice was really fun as I had the opportunity to test a new technique.
My “Straight Ahead” animation
Bruce Bickford
Bruce Bickford(1947) is an American animator who has collaborated with the musician called “Frank Zappa”. He was known well for his clay animations. Back in the day, no one was ever close to him in terms of animation technique and transitions. He was also considered as an outsider, because he has learned everything by himself. He also has some crazy – illusive type animations which confuses the audience.
Daniel & Clara(2017) Mr Bickford Discovers a New Land
Examples of Bruce Bickford’s Animations
Bruce Bickford has a lot of diverse animations, which ranges from hand-drawn to clay type animations. The animations are usually confusing and has a lot of stuff going on. To regard the type of animations, he usually creates horror or avant-garde.
I personally founded Bruce Bickford’s animations really ahead of its time as they are really unique and detailed. The small details on his animations really caught up my attention while watching. The confusion in his animations also make it really mysterious.
After we have covered every aspect of the “Straight Ahead” technique, we have moved on to learn about the “Pose to Pose” animation. In this technique, you only need to draw specific perspectives and frames in order to complete the animation contrary to Straight ahead. The key in this technique is that you need to have good transitions otherwise the animation is going to get ruined.
Pose to Pose animation example / reference from the lecture
Starting off, I have tried to create a very simple “Pose to Pose” animation with 3 different facial expressions. I have done this exercise to get familiar with the transitions.
My “Pose to Pose” animation with 3 different facial expressions
As our next task, we are aimed to create “Pose to Pose” animation with using a character of our own. For my character design, I have chosen something very simple in order to animate it well. I have decided to create a female character which rules the stars. Because she is the ruler of the stars she wears a star tiara. As her facial expressions, I have started off with a slightly grumpy face which then turns into a neutral expression. Lastly, the neutral expression finishes as a smiling face at the end.
For the background, I have tried to create a shooting-star animation which moves downwards as the facial expressions change in my character. I have had this thought for my background as my character is related with stars.
My “Pose to Pose” animation with an animative background
Arcs of Motion
The principle called Arc of a Motion is an animation principle that refers to what in real physics we know as trajectory or path of motion. From an animation standpoint, it defines the flow of motion in both time and space. Its main purpose is to give the feeling of an organic and natural movement.
This principle is best exampled by the walking cycle, bouncing ball or the human walk.
By knowing the time and space principle, you can calculate the objects’ travel distance in a certain time period. The amount of time an action takes to complete can vastly change the meaning and tone of what is being communicated. The timing of the bouncing ball example is the timing between the bounces.
When an object moves, its movement indicates the rigidity of the object. Many real-world objects have little flexibility, such as furniture, however, most organic objects have some level of flexibility in their shape.When moving, organic matter has a flexibility and malleability to it, a kind of rubberiness which animators can take advantage of and use to accentuate and exaggerate certain movements.
According to the principles that we’ve learned from the lecture and from our references, it is our time for us to replicate a “bouncy ball” animation. For this animation, I have used my lightbox. I have tried to make my animation look really smooth. In total, I have used 21 paper sheets in order to complete my animation.
My process of the “bouncy ball” animation in my lightbox
After I have taken pictures of my paper sheets in the right sequence, I have created a gif out of it.
Gif of my “bouncy ball” animation
Character Animation
After I’ve done the simple “bouncy ball” animation, I have moved on to the next step which is animating a character in the same way. For my character, I have decided to create a cute alien-type creature.
Gif of my character animation
Ease Out & Ease In
One of the fundamental principles of animation is to ease out or ease into a given action. The movement of the body, and most other objects for that matter, requires acceleration to reach the desired speed. The animator, therefore, needs to use more in between toward the beginning and end of an action to make it look convincing. This needs to be worked out in advance using an animation chart. This is called ease out and ease in.
After we have learned everything about the “Ease Out & Ease In” technique in our lecture class, we have directly moved on to our activity. Our aim was to create a Ease out & Ease In animation with creating a character which had 3 different hand poses. For my character, I have decided to choose a very simple one in order to animate it more precisely.
My Character Design Sheet
The trick in this technique is to pause and re-shoot frames in order for it to be more accurate. In between the frames, we also need to create new frames in order to create a transition between them.
Gif of my “Ease Out & Ease In” animation
Walk Cycle
The walk cycle is often described as the benchmark model of animation and what you learn here will be applicable to all other forms of character (and often non-character) movement. The way a human walks is instantly recognisable. We can spot our friends or family from great distances with low visibility, just by the way we move.
As our next task, we have been asked to create a simple walk cycle on our Lightboxes. To begin with, our tutor didn’t want us to add the arms of the skeleton as it makes everything crowded for the beginning step. So, we created a very simple walk cycle with no arms.
This step was really easy for me as we have only created the body and the legs of the skeleton so I have finished it really quick.
My Walk Cycle animation
After I have finished the simple walking cycle, I have moved on to the next step which is adding arms to my skeleton.
My Walk Cycle with arms added
Head Turn
The head turn is a frequently used element in many animated films showing a character shifting his/her attention from one thing to another.
Head Turn drawing examples
In this task, we are aimed to create a character of our own and use the “Head Turn” technique to animate them.
Character Design
As for my character design, I have decided to create a fat cat which has a grumpy expression. Since we should create a small storyline for our animation, I have decided to create a storyline of my cat character encountering a mouse and is getting shocked.
To begin with, I have first created my character from scratch and sketched different face expressions.
My fat cat character Face expressions of my character
Animating Head Turn
After I have finished my character design and face expression, I have moved on to the next stage which is creating a head turn animation.
I have started with drawing my cat character looking from the left side. Next, my character turns to the middle and then to the right side, lastly getting shocked because he is encountering a mouse.
The “Visual Effects” rotation is the second rotation which I’ll be doing. Our main aim in this rotation is to create cinemagraphs.
After our tutor has given the brief introduction for the “Visual Effects” rotation, we have been asked to create mind maps, researches about our storyboards and brainstorming about our topic which we’ll be working in detail to create cinemagraphs.
I am really excited to work in this rotation because I will learn to use softwares like Nuke, Adobe Premier Pro and Adobe Media Encoder which will be essential in order for me to create cinemagraphs.
About Cinemagraph
Cinemagraph’s are often described as “lively photos”. They are a combination of magical hybrid photography and video. They contain subtle motion that plays in a short, never-ending loop, while the rest of the image remains still. The motion highlights a few seconds from the video, blending it seamlessly into the still photo.
Cinemagraph’s are similar to gif’s, while Cinemagraph’s being a still image with a moving part. Gif’s are fully moving compared to Cinemagraph’s.
Cinemagraph created using Flixel Cinemagraph Pro by Philipp Frank
As our first task, we were asked to create a “Mind Map” to explore our possible outcomes. While listening to the brief, I have thought about doing my morning routine as my cinemagraph topic. So, I have decided to explore every possible way of creating it.
Mornings are usually my favourite time of the day as I love to take a hot shower and eat a delicious breakfast. I usually eat avocado spread and eggs toast, and a Philly cheese spread on top of raspberry & strawberry jam. My other option of breakfast is simple eggs such as scrambled or omelettes. My third option is a more simple one which is greek yoghurt with granola on top. I usually eat this if I’m going to school in the morning or If I do have an online class.
My mind map of “My Morning Routine”
History ofBreakfast
Before getting directly into my work, I had thought about breakfast as my research topic. Since our childhood, our parents usual get angry if we do not eat breakfast or not eat it properly. I never thought the reason of why did they used to say it like that to us when we were small kids so I had the urge to research it in this rotation class.
Breakfast is around us for a long time, just like other meals it is the first one to happen after our day starts. It is actually to be said that breakfast has officially started around the world in “Late Stone Age(Neolithic)”. Around these times, Neolithic people used large stones to grind grains to make some sort of porridge. Porridge was also known as the staple of “Roman Soldiers” diets, they called it “Pulmentus“.
The breakfast that we are all familiar with started around the 19th century, when some middle- classed men started to work regular hours in offices. Prior to that, people would often work around a few hours and then eat their meals at around 10 am.
Wives and kitchen staff would usually serve these 19th commuters a two-course meal that would often begin with porridge and then completing it with what we call “The English Breakfast”. It would contain toast and eggs with bacon or fish. But towards the end of the first World War, lighter breakfast choices have appeared as it was not referred as “English Breakfast”.
Eating breakfast in general had become a more elegant move in the 19th century, at least in well-off households. Around 1861, Book of Household Management, Isabella Beeton suggested a daily breakfast buffet which included a cold joint of meat, game pies, broiled mackarel, sausages, bacon and eggs, muffins, toast, marmalade, butter, jam, coffee and tea.
Towards the end of 1800’s, a backlash against Beeton’s diets have appeared. Groups like “7th Day Adventists” protested that meat-based breakfasts were leading to ill health. Over the next few decades, pioneers like John Kelogg, W.K Kelogg, Henry Perky and C.W Post developed “ready to eat” breakfasts that would become a quick and efficient choice for people all around the world.
Around 20th century, cereals and muesli type food were being invented in Europe. Also, with the invention of cereals, women who has entered the workforce no longer had to cook a full meal in the mornings. Children had the option to prepare meal for themselves.
As the years went on by, varied food options for breakfast emerged all around the world. Now, despite the options available, people do not have enough time to take a breakfast.
I really founded this article about the history of breakfast really entertaining and interesting because I never thought porridge was actually the inventor of breakfast.
After I have researched about the “History of Breakfast”, I have moved on to the next step, which is taking my test shots of my storyline. I have downloaded the application called “Pro Cam 8” to take my shots. This application covers professional aspects of framing and shooting pictures / videos compared to other applications so I have decided to download this one.
As for my first shots, I have decided to go on with taking the sky from my dorm room. After I get out of the bed, the first thing which I do is to control what the weather is like. I am imagining of moving the clouds to create my cinemagraph. I have explored and experimented different exposures and light tricks while taking my shots, happy with how they turned out.
Collage of my “sky” shots
Moving on, I have taken shots of my shower. Usually I take a hot shower every single morning after I wake up. I really love to take shower in the morning because If I’m sleepy it wakes me up and boosts my energy for the rest of the day. Again, I have explored different exposures for these shots as well.
Collage of my “shower” shots
For the next step, I have taken shots of my breakfast time. I usually eat avocado spread & eggs on top and Philly cheese & jam on top combination.
Before I was going to prepare my toasties, I have decided to create a stopmotion animation to cover up all of the steps. I am really proud of what I have created as I wanted my reflect what I possibly want to create as for my cinegraph shots.
“Preparation of my toasties” gif
Just like the other shots, I have taken it on the “Pro Cam 8” application through my phone. I have tried to cover all of the possible light exposures.
Collage of my “toast” shots in breakfast
As an iteration of my “toast” shots, I have asked myself “What would it look like If I have drawn it digitally?” So, I have given it a try. I have tried to observe and draw my toasties with my drawing tablet on my computer. I am really proud of how it turned.
Digital drawing of my toasties
Other than toast, I really like to eat greek yoghurt with granola on top. I usually eat this type of food when I have a class because it is really quick to prepare and quick to eat. To create something different rather than my other shots, I have decided to play with the saturation of each shot. I absolutely loved how it turned out.
Collage of my “yoghurt” shots
After I have completed my shots, I have tried to observe and draw my yoghurt bowl as well. I personally think this one is good in terms of drawing but I prefer the toast drawing compared to this one.
My yoghurt bowl drawing
Storyboarding
As my next step, I have started to plan my storyboard. First, I have sketched everything on my sketchbook. I have drawn 7 frames in total. While planning, I have tried to reflect every single stage according to my “Morning Routine”.
First, my storyboard starts with me getting out of the bed so I have drawn my bed with the blanket slightly messy in order to reflect my action of “waking up”.
Then, I have sketched out the sky, which is because I always check out what the weather is like after waking up.
Then, I have sketched 2 frames in the bathroom. The first one is the sink frame, which I wash my face and brush my teeth.
The second frame covers up the shower part, which I almost take a shower every day.
Moving on, the rest of the frames are all related with the action of taking a breakfast. First frame covers up me frying the eggs.
The second part covers up the toast frame, where I have a full image of my toasties ready to eat.
The final frame is about the yoghurt with granola, I have sketched it in this way to reflect that I always change what I eat.
Storyboard Collage
After I have managed to finish my sketches about my storyboard, I have moved on to the next step which is exporting my sketches onto real images. So, I have taken 7 photos with my phone by using the app “Pro Cam 8” according to the sketches that I have made. After I have finished taking the photos, I have converted each photo onto a collage to resemble what my storyboard will actually look like.
My storyboard collage
Cinemagraph Making
After I have covered up every process in the making, the time has come for me to create cinemagraphs. I have watched every single tutorial which our tutor has shared with us and started to create my own cinemagraph from scratch. As my first cinemagraph I have moved on with the “eggs frying in the pan”.
I have tried to cover up everything from the tutorials so I had spent a lot of time trying to understand about the program “Nuke”. At first, it was really hard to keep up and manage to do even a simple thing because there are a lot of different hotkeys and specialities in the program. After a while, I have created my nodes in Nuke and started to put keyframes on to my image. By this way, I have created a simple yet fascinating cinemagraph. Since it was my first try, I didn’t expected to be really good but in my opinion I still managed to get a pretty decent cinemagraph.
Since we are learning remotely, I had some errors and mistakes like saving the file in the wrong place etc. but covered them up as the time went on by. As for my first try, I believe I did a good job.
My cinemagraph process in Nuke
My final setup of Nodes in Nuke
After I have completed my first cinemagraph, I have moved on to the next one which is the “washing hands” image. Unlike the first one, I didn’t encounter problems with the nodes this time but I was still confused with how the keyframes and the whole animation process works. So, I have watched our tutor’s tutorial for about 10 times and other tutorials as well to check if I’m doing something wrong. At last, I have managed to get the animation working.
I have put a lot of keyframes to this image because I couldn’t animate it as I wanted in the beginning.
My animation process of “washing hands” image in Nuke
Then, I have moved on to the next cinemagraph which is “waking up”. I have decided to animate the quilt part. I am really proud of how it did turn.
My animation process of “waking up”
As for my fourth cinemagraph, I have used the image “taking a shower”. I have tried to animate the water part from the head of the shower and also the body washer sponge.
My animation process of “taking a shower”
Moving on, as for my fifth cinemagraph I have chosen the “yoghurt with granola” image. I have decided to animate the yoghurt part for this cinemagraph. I really liked the ending result.
My animation process of “yoghurt with granola”
Before the final cinemagraph, I have completed the “sky with clouds” image. While showing my work to my tutor he has informed and gave me feedback about moving the clouds. After he has told me that it can be hard to move clouds in Nuke I got a bit confused about whether I should animate it or not. But after trying, I have managed to move mine. It has a small animation and the person who is viewing it needs to pay attention to the clouds in order to see it.
My animation process of “sky with clouds”
As for my final cinemagraph, I have done the “egg & avocado and philly on jam toasties”. I have decided that I’ll be moving the jam part for this cinemagraph. I have tried to make it look like it’s dripping down the toastie. I am happy with how it turned in the ending.
My animation process of “egg & avocado and philly on jam toasties”
Since I have finished all of my cinemagraphs, now it’s time for the rendering process in “Adobe Premier Pro”.
Rendering in Adobe Premier Pro
As for my final process in this rotation, I have moved on to the rendering process in “Adobe Premier Pro”. This program is really useful to render movies together as it is really simple to use. After exporting my cinemagraph videos from Nuke, I have exported them onto Premier Pro. After I have exported everything which I have made onto the program, I have arranged them onto a sequence.
My cinemagraph rendering process in “Adobe Premier Pro”
The moment when I was sure I got the right sequence, I have exported it as a video. Now, I got all of my cinemagraphs in one video.
I am really happy to take part in this rotation as I have learned how to use new programs such as Nuke, Adobe Media Encoder and Adobe Premier Pro. But most importantly, I have learned how to create a cinemagraph!
What I am? Where do I belong? What do I want to be? What do I aim to become? The questions keeps going on… For everyone else, maybe I’m just a girl who likes to draw. But nobody knows my true identity and my actual thinking behind.
Everyone in this world has a different thinking and understanding process. The joy, the sadness, the excitement and the anger changes in ratios and aspects for each person. Some people may express it more deep and vividly, while some does not show any clue of their emotions at all. These simple yet important factors in human nature matters a lot to me. But how?
I remark myself as an observer. I observe people and their emotions and try to collect information of everything little by little. Every small aspect and emotion can derive me to create something new. This can be anything possible. For example; a character drawing or such. But why do I keep on observing to create something?
I choose this particular way because my main aim in this world is to create the impossible. I believe that I can achieve this by exploring everything around me. I always aim to search through different sources of information and by thinking outside of my box. I frequently try to challenge myself throughout different aspects to create something unique. This is how I explain “Me”.
Object Activity
As our first task, we have been asked to create a Padlet that is related to objects. We needed to put 6 objects in total which had a meaning to us. As for my objects, I have chosen “Iphone, Computer, Drawing tablet, Fairy Figure, Chopsticks”. These objects are the most important ones for me because they are all related to my communication & my interests.
A better explanation of my objects:
My computer: This is the most important object out of all because I complete my school works, my artworks and play games in my PC.
My computer
Fairy Figure: This figure represents my inner fantasy mind. I’ve grown up watching shows like W.I.T.C.H, Winx and even now I love to watch fantasy stuff which includes fairies, witches, magic spells etc.
My fairy figure
My Iphone: My main source of communication.
My Iphone
Chopsticks: This object represents my fascination with Japan. Since my childhood my love for Japan didn’t change. One day, I want to live in Japan.
My chopsticks
Drawing Tablet: This object is what I can’t live without. I always draw and complete my artworks with this tablet.
My drawing tablet
Suitcase: Since my childhood, I’ve been travelling everywhere around the world.
My padlet page “6 objects that have a meaning for me”
As for our second task before getting into our project, we have been asked to create a Padlet page again. But this time instead of objects, we had to contain drawings or pictures of the people that had an importance to us.
I didn’t draw anything for this one because I didn’t have any ideas of how to make it entertaining. I also thought that it would be really good if I added pictures rather than drawings because I always draw on a daily basis. So, I wanted to make a change for myself with posting pictures of them rather than drawing.
The people I have chosen are the ones who are the closest to me. They are; “My mother, My dad, My boyfriend, My grandma, My Grandmother, My Grandpa”.
A better explanation of the people which I have chosen:
My Mother: I love her more than everything. She is not just my mother but also my best friend, my sister and my reason to still keep fighting towards everything.
My mother
My Dad: Just like my mother, I love him more than anything. I really miss to play games and build amazing things out of legos back when I was a child.
My Dad
My Boyfriend: He has become my world since the 10th of February, 2018. I love him more than anything!
My Boyfriend
My Grandma: She is like my second mother. Next to my grandpa, She has taken care of me in my childhood.
My Grandma
My Grandpa: He is a really important person in my life. He has contributed a lot in my growth.
My Grandpa
My Grandmother: I cannot see her very often as my other parents because she lives far from our home in Istanbul. But I still love her so much!
My Padlet page “6 People which has an importance for me”
Cultural Identity
Culture is the shared characteristics of a group of people, which encompasses , place of birth, religion, language, cuisine, social behaviors, art, literature, and music. Some cultures are widespread, and have a large number of people who associate themselves with those particular values, beliefs, and origins. The culture encourages and adapts people’s behaviours and the way they grow up. When people meet up with different people from different cultures, they have the opportunity to reflect and showcase what they are made of and where do they came from.
As our next task, we have been asked to create a Padlet under the topic “Cultural Identity”. For me, culture becomes one with these; Peace, Unity, Food, Helping Others.
Peace: I believe peace is also very important in the meaning of culture because a culture should only stand up with the power of peace.
Food: I believe that food is an important aspect of culture. The reason of this is that it is unique to every culture and by this way people can identify where you belong to.
Moving on, we were asked to create a 15 second’ video about the meaning of “Here” for us. I was quite unsure what to do at first glance, but then I have decided to take shots of what I do in a daily basis. I have decided that the things which I do on a daily basis actually covers up the meaning of “here” to me. The reason of this is because while doing these actions, I remember that I am here.
As we were debating in our online class, we had a small task to do. The task was about mapping the “significant place” from our memories. We were asked to create a map and answer several questions about it. As for my own map, I have decided to draw my first house’s map from my memory and labelled my house with a star as a point.
What Is the Significance?: The significance of Ata Olgac Street for me is that it is the place where I started to grow up and live my life. I am still living in the same house in Istanbul.
Where Does The Place Begin and End?: The Street begins in a hilltop and ends at the beginning of the stairs, which is connecting to the seashore.
My map of “Ata Olgac Street”
Sound & Motionin Animation
Animation and sound together can be depicted as a whole. They are just like a harmony if used together. Animation is the main sequence of motion and sound is the guide to it. By motioning it in the right way, the animator can give every aspect of information to the audience. And by using the right sounds in the right time, the animator can express the right feelings within the frame.
Tim Macmillian – Ferment(1999): This animation was directed by Tim Macmillian in 1999. It is a motion-lapse animation. The camera movements were usually still between the frames which I thought it was an amazing idea to create a concept like this. During the frames, the most recognizable thing was the sounds. There were sounds of people screaming, animals, classroom noise etc. The sounds were really remarkable overall. I have really enjoyed watching this animation as I thought it was really impressive in the way of camera movements and the sounds.
Jonathan Hodgson – Feeling My Way(1997) In this particular animation, Jonathan Hodgson captured his way from home to work in a dynamic animation. The animation itself is really abstract and includes different types of work collaborated together. The animation is a mixture of live-action footage with painterly animation work and collages on top of the footage. There are different sounds occuring within each frame, but the most recognizable and the stable sound throughout the video is the walking sound. I really loved how Jonathan Hodgson captured and played with each frame of this animation. Overall, it looks fantastic and I feel like I can watch this forever.
Vimeo – Jonathan Hodgson(2011) , Feeling My Way(1997) Available at: https://vimeo.com/32255983 (Accessed: 27th Nov 2020)
The Brothers McLeod – Marfa(2017) This animation is completely based on sound. It is based on a town called “Marfa”, which is located on the borderlands of Texas. The visuals were hand drawn based on the sounds. Most of the time there were people talking and the visuals were changing according to what they say. I have founded this animation ultimately creative and distinguishable from what I have encountered so far.
Vimeo – The Brothers McLeod(2017) Marfa, Available at: https://vimeo.com/288702427 (Accessed: 27th Nov 2020)
Field Work
As our next task, we have been asked to go out around our neighbourhood for a fieldwork. Our aim is to capture everything around our neighbourhood and then create a map out of it. These can be buildings, objects, the conversations between two people, the smell etc. For this activity, I have created a 10 cm wide paper frame in order to capture scenes. After I have finished my frame, I have went out from my dorm room. First of all I have captured the scene around my dorm.
The first scene around my neighbourhood
After I have captured this scene, I have sketched it through my sketchbook. I have also wrote down every single aspect like time, the smell around the place. After I have created the lineart, I have decided to colour it on my computer, using a drawing tablet. At first, I thought that I would colour it traditionally but then I have changed my mind and coloured it digitally to add some material iterations to it.
My drawing of the scene, coloured digitally
Moving on, I have taken the second frame after walking a while. This area was a bit more loud compared to the first one as there were more people talking. I have again sketched it and completed it back at home. I have also coloured this one digitally using a drawing tablet.
The second scene around my neighbourhoodMy drawing of the second scene, coloured digitally
As for my last scene, I have found a unique scene which I believe was a church. The shapes around the building was really fascinating. I have sketched it while looking at it and then completed the lineart back at home. Coloured it digitally.
My third scene around my neighbourhoodMy drawing of the third scene, coloured digitally
Mapping Process
As for my last step, It is time for me to create a map out of the things I have observed in this fieldtrip. I have used a map of my neighbourhood and put my pictures & drawings on top of the map. I really liked how the final product is looking as it looks really abstract.
The map of my neighbourhood
Words & Stories
As for today’s lecture, we had the chance to check out words and stories as a whole. Our tutor also had asked us to write a short story for our homework which is about 10 to 50 words in total. As for my short story, I have decided to reflect my inner self by writing a fantasy story. I have wrote down a story which is about a land which absorbs dark magic inside but after the queen and the king gets married to each other, the land itself gets cleaned by the dark magic. At the end, the land gets filled up with joy and love.
My Short Story: Once upon a time, there was a land filled with dark magic. But after the queen and the king got married, the darkness across the land disappeared. Everyone got filled with joy and love. The whole land was reunited and got escaped from the dark magic.
After I have shared my story with the class and my tutor, we have separated onto groups of 2-3. This time, our aim was to change our stories into words. We had to find these words from other people’s short stories. I have separated with Polina and Sheryl and used Sheryl’s words which are associated with her story. These words were;
dead street
Afternoon minutes
dead sister
I have then mixed these words with the words which I have used in my story:
“dead sister of the dead street”
“darkness filled the whole land”
“reunitement and joy”
“the joy vanished the darkness”
Padlet post of my mixed words
The outcome was really different than which I have designed. The words which I have picked up from Sheryl’s story made my concept really different.
After we have completed this activity, we have discussed about writers which are Raymond Carver, David Gaffney and Dougal Dixon. We have talked about their usage of words, which I thought it was really interesting as a whole. After this activity, we have looked at words. We have mainly discussed the usage and types of words. Some of these are typography, fonts, short stories, books, poems etc.
Usage of “Words” / reference from our lecture video
Sound
The term “Sound” is very universal and it is the thing we hear every second. A life without sound would be so empty in every aspect. There are also different types of sounds that we hear in our daily lives. These are;
Ambience is the thing which creates and builds up the area. It can also be referred as the “background” tone. It is a fusion of many small and indistinct sounds that build up to become a blended whole. Some examples are;
Music is around us for a very long while. It has the power to build up serotonin through our brains and our body. Each person has its’ own distinct choice of genres. We hear music from cars, shops, other people’s headphones, neighbours gardens, apps, games etc…
Under the topic “Introduction to Animation”, we are aimed to create or form something which explains and describes our inner selves. This can be a book, a zine, or even something which is totally different like a shape of apple. But the most important thing about this project is that it needs to be about ourselves and what we are all about.
For this project, I have thought about creating a pop-up book which reflects myself. I will use different materials for this project and I want my book to be completely interactive with the user. I want to reflect what I am all about.
Map Animation
After we have learned every aspect of sounds, ambience, stories, words etc.. the time has come to mix everything that we know into a 20-sec animation/video. This activity has no right or wrong so it is directly up to ourselves.
For this activity, I have decided to go with a stop-motion animation video. The reason behind this is that I’m not around my neighbourhood right now so I can’t go out and take actual footage. Moving on, I have started to brainstorm about what can I create after I have decided upon the stop-motion decision. A short while later, I have had this brilliant idea about frame-by-frame taking pictures around my neighbourhood through Google Maps. Since Google Maps has the tool to really show how it is really like around the streets etc. I got this activity quickly covered up.
An example of the realistic mapping tool in Google Maps
After I have taken pictures frame-by-frame, I have decided to paint some of the images in an abstract way. I was inspired by the short-videos which our tutor has suggested for us. The time when I was done with the painting process, I have started to search sounds for my stop-motion animation video. During my field-trip, I have come across with different sounds through my neighbourhood. These were car noises, wind and a few bird noises in the ambience. To make things exact, I have searched for the sounds effects of what I have encountered when I have gone out for a field-trip.
For the last step, I have uploaded every image onto the program called “Movavi Video Editor”. After I have put everything in sequence, I have combined the images with the sound effects.
The process of my animation video in program called “Movavi Video Editor”
I am really happy about how it turned in the end. The animation itself looks really abstract with my brush strokes on top of the images.
As for the book project, I decided to create a “Zine” type book. This Zine which I’ll be making will include everything about myself, including my inner side. It is going to be 12 pages in total. My aim is to give a lot of details about myself in such a short amount of space.
I really want to reflect what I am truly made of.
History of Zines
(Chloe Arnold,(2016) Since the 1930’s, Zines have been a very popular cultural traditional all around the world. Started with ”The Comet” in 1930, in a Science Correspondence Club in Chicago. The topic of this zine was about sci-fi and its topic lasted for a long time in the zine industry. Then, in 1943 a zine called ”Fantasy Commentator” started and became the most important Sci-fi zine(Ended in 2004)
After a while, in 1967 the sci-fi zines got even more popular with the outcome of the Startrek fanzine ”Spockanalia”. It gained a lot of attention which even the famous actors like D.C Fontana, James Doohan, Deforest Kelley, Leonard Nimoy wrote their own letters in character. Besides its popularity, Star Trek was aiming to finish the show after 2 seasons but a letter campaign through the fanzines, 160.000 people was able to get the show back for about 1 year more.
Science Correspondence Club Fanzine “The Comet”(1930)
The Startrek fanzine “Spockanalia”(1967)
Around the ’70s, zines got a lot of easier for the zine-makers to produce, because of the technology’s development. In addition to technology, copy shops also allowed zine-makers to sell their works for a cheap price. In 1970s, sci-fi zines got more shallow and ”Punk” zines started to show its identity in London, New York and L.A. Comparing Punk zines to other ones, punk had a more grungy, more aesthetic background which a lot of topics were being covered. The first punk zine to get released was the UK based ”Sniffin’ Glue” zine. The first issue was published in 1976. Other famous punk zines were ”The Clash, The Ramones, Joy Division” etc. The popularity of other zines which helped punk zine to get in the scene also got finished after a while.
Mark Perry(1977) Sniffin’ Glue, Courtesy Of The Mott Collection
From 1970-1990 zines’ popularities diminished a bit, but flourished again with the publishing of ”Riot Grrrl”. As an alternative to the male-punk scene in the past, Riot Grrrl helped girls to start their own bands, their own zines and get their voices to get heard through the community. Bands like ”Bratmobile, L7, Sleater-Kinney etc got in the scene and around 40.000 zines got published with the help of ”Riot Grrrl”. But according to some, Riot Grrrl was more than just a zine, it was a feminist movement, a political act. Many of the band groups’ members had their own zines. In 1993, Riot Grrrl started to get published in magazines rather than zines.
Today, zines are like nothing compared to the past, the topics are quite different from the past. Unlike the old times, zines now can get accessed through online with the internet. Young artists in our generation also started to publish zines through the internet to the audience.
As for my inspiration through the making of this project, I have had several artists which has helped me to construct an idea about my book. These artists are mainly Joseph Cornell, Marie Paccou and Simon Evans.
Joseph Cornell
Born in 1903, Joseph Cornell is best known for his illustrative collections, compulsive collecting and the way he gives a connection from himself to the items that he have founded. But what makes Joseph Cornell different from the other artists around the world is that he is always travelling around, but not travelling around the world, he is travelling in his own imaginations and his own ideas. By this particular way, he has mastered how to collect materials inside of different sized boxes. This specialism of him really interested me alongside his collections, which made me want to research him more.
Courtesy Center for Creative Photography(1991) Joseph Cornell
Looking at Joseph Cornell’s collections and projects, he managed to create diversity between surrealism and creativity at the same time. Joseph Cornell inspired many artists around the world and opened tons of exhibitions as well.
How did I got inspired?
Apart from other artists, I have always been keen on researching Joseph Cornell’s artworks. I love that he always experiments different materials with different mediums and is never afraid of trying something different or something that he has never tried before. For this particular project, I got inspired by Joseph Cornell’s collections and decided to document my feather collection which I have collected in my childhood.
Marie Paccou
Marie Paccou is an animator from Clermont- Ferrand in France. She is mostly known for her “flipbook” and “stop motion” animation type videos.
As I was watching her stop motion videos, I instantly got an idea on how to film my book and got ideas about my childhood. Back when I was a child, I used to read a lot of books and sometimes drew on top of them. Then, I have decided to add drawings of my childhood and compare how I changed over the time. I have decided to reflect my artistic journey on my book thanks to Marie Paccou’s animations.
Simon Evans
Simon Evans is the artistic collaboration between Simon Evans and Sarah Lannan. The artists create dense text-based collages saturated with short, poetic phrases, drawings, and images often created from the detritus of everyday life both inside and outside of the studio. They describe a world poised between two poles of earnestness and irony. With a wry brand of melancholy, Simon Evans™ presents us with a laundry list of drawings that take the form of diagrams, charts, maps, advertisements, diary entries, inventories, and cosmologies that plunge the viewer into alternate states of pathos and hope.
I was really intrigued by Simon Evans’ artworks as I directly decided to create something similar to his artworks. Inside my book, I have decided to put the stains which are important for me. I have decided to do this way as I thought that it would be a great opportunity for people to gain information about me and my inner self.
Granddaughter of immigrants from the Balkans to Turkey
I am a globetrotter
I love to travel
I love summer, sea
I have been drawing since the day I remember
I am disciplined,
Perfectionist
Ambitious
I like surprises (The very first question I always asked my mom when she came home from work)
I am an explorer ( I like to spend time in the nature- forest, beach, island etc.)
I have a sweet tooth, I always love candies, chocolates and cakes (My mom travelled and she brought me these at all times)
I Loved to capture moments, I always recorded objects, my nanny, I took pictures of myself, my parents.
What Am I Curious About??
Mystical things
Fantasy Characters
Witches
Superheros
Magic
Fairies
Rainbows
Super Powers
What Is Important To Me? Why?
My Work
My Family
My Boyfriend
Book Making Process
After I have researched about several artists and formed my ideas about what I’ll be making as my book, I have started to build it up. I have decided my book to be very experimental in terms of the materials which I’ll be using. So, I have used materials like magazines, newspapers, photographs and coloured papers.
As for the beginning process, I have started with making my book from scratch. I have searched for some tutorials but ended up using my own techniques and methods. Since our book is supposed to be 12 pages long, I have first started off with creating the cover and the back cover of the book with folding a hard paper. Then, for the inside of the book, I have folded 6 different coloured papers onto 2 and put stuck them together. As for the last step, I have merged everything together and built up my zine book.
Coloured papers which I have used in the making of my book
Inside of the book
Because this whole book project is a guide about ourselves, I have decided to make my book title “Me N Myself“. “Me” equals to the person who you see and “Myself” equals to my inner self. As for my cover page, I have decided to create a small drawing of myself, without colouring it. The main reason behind this is because I show my inner colours to people after a while later. Before people get to know me, I reflect them my unknown side to them. If someone tries to get close to me and I know that they are good inside, I reflect my true colours to them which are equal to rainbow colours. Since it is the cover page and the reader still hasn’t have a clue about me, he or she needs to turn the page for me to reflect my inner colours.
My book cover page
For the second and the third page of my book, I have decided to create an intro. For this process, I have found several random people from the newspapers and stuck them onto my pages. On top of the newspapers, I have drawn a full-body artwork of myself and stick it to the centre. I have also cut and stuck “Who Am I?” writing on top of the pages.
The whole idea behind this page is to get the reader more excited about what’s going to come next. I have cut all of these people from the newspapers to reflect that they all have a distinct personality inside, which I do too.
The newspapers which I have used for my book
The newspapers which I have used for my book
My second and third book pages
Moving on, as for the fourth and fifth pages, I have decided to go deep down to my childhood. My childhood was very bright, I never wanted to grow up. I have travelled around 20 countries including Maldives, Thailand, Innsbruck etc. Since I wanted to include my very best photographs from my childhood, I have searched through my childhood photograph driver. For the fourth page, I have done a collage of my childhood pictures.
At first, I have thought about filling these two pages only with my childhood photographs but then I had a different idea about sketching the toys which were essential in the part of my growth. So, as for the fifth page, I have sketched the toys which I liked the most. These toys were my big baby, my red kangaroo plush, my sheep plush and the angel cards which I have used to play with my mom.
My fourth and fifth book pages
Next, for the sixth and seventh pages, I have decided to introduce my loved ones. These are my mother, my dad, my grandma, my grandpa and my boyfriend. I have printed out their pictures onto glossy paper and stick them to the pages. Since my dad and my mother are the most important two people in my life, I have created sketches of them with me. I have made these sketches by looking through our old pictures. Finally, I have also drawn a picture of me and my boyfriend in my computer. The reason why it is digital is because I wanted to add a different medium to my book.
My sixth and seventh book pages
As for my eighth and ninth book pages, I have created a completely different thing with using different materials and techniques. For my eighth page, I have imported my feather collection which I used to collect in my childhood. This collection is really important for me as it is my very first attempt in collecting things. After my feather collection, I have collected various things like seashells, crystals, rocks etc. I have decided to include my collection after I have researched about the collector artist, “Joseph Cornell“. While viewing his work, I was quite impressed that he has created artworks dedicated on nothing but the things that he collected. His artworks sparked an idea in my mind and I directly remembered about my feather collection and decided to make it a part of my book.
For my ninth page, I have created and stuck the stains which has an importance for me. I was inspired by the artist called “Simon Evans” for this whole idea. His artworks are very experimental and are distinct from what I have seen so far. I was really intrigued by this idea as I decided to create my own stains. The stains which has an importance for me are; Tea, coffee, soil, raspberry jam, honey and grass. The stains which I have chosen are mostly related with my daily consumes and 2 of them(soil and grass) are about my adorance towards nature. I have grown up being a part of the nature. I have went to parks, to the forests, to everywhere which includes a part of the nature. So, these two stains remember me those good times.
My eighth and ninth book pages
Finally, as for the tenth and eleventh pages of my book, I have decided to focus on my artistic journey. Art has been a major part of my childhood as it is now. I used to have tons of different materials like colouring pencils, watercolours, glitter glues etc. I even remember me drawing to the ceilings. Because of this reason, we had to renew the ceilings since there were pencil stains all over. So, I have printed out my childhood sketches and artworks onto glossy paper. Of course they are not very impressive as a whole but I still believe that they have a great amount of importance in my artistic journey. The paintings which I have added onto my book were from the years 2007-2010.
For my eleventh page, I have added my recent drawings to complete the cycle. I have decided to add my recent drawings to depict how I have improved over time and how my art style has changed.
My tenth and eleventh pages book pages
As for my back cover, I have only drawn a small star and written a small descriptive writing about my book.
My back cover page
Sound
For the sound process, I have used 2 main resources. First one is my own sound recordings and the other one is the sounds which I have used from copyright-free videos. In the process of recording my own sounds, I have tried to create each sound which I’ll be using for my video but unfortunately I couldn’t manage to get them all correct as I have imagined. So, I have researched sounds effects from Youtube for particular sounds like magic effect, bee buzzing etc.
For the sound recordings of my own, I have used the recorder tool on my phone. Also for some scenes, I have managed to take sound recordings off my childhood videos. I have found these videos from our hard drive.
My sound recordings
Film Making Process in MovAvi
As for the last process of our project, I have decided to create my film in the program called “MovAvi”. I was inspired and intrigued to create a stop-motion film myself after watching Marie Paccou’s short-film animations.
Since I am creating a stop-motion film, I have uploaded each picture in the right sequence.
Pictures which I’ll be using for my film
I have had 66 pictures in total. Next, I have trimmed everything down to 35 seconds from 2 and a half minute. This step was really rough as I had troubles trimming down to the second which I wanted. As for the last step, I have added each one of the sound effects onto my film. Then, I have moved and placed these sounds in the right order.
My video making process
After I was finished with the making of my video, I have uploaded it to YouTube.
Under the project name “You are Here”, I have tried to reflect my inner self by touching upon topics like my childhood, my interests and my family. I have created a 12 paged zine book which alternates various materials and ideas about myself. Everyone has their own back story; In this project, I wanted to show the bits of my past, and how I am doing right now.
As our first project this year, we have been asked to create a 40-second’ animation under the name “Topsy Turvy“. The meaning of “Topsy Turvy” can refer to many things such as; being confused, upside-down and disordered.
I am really excited about this upcoming project of ours because it will be something which I have never tried before. We have a load of tasks to accomplish; such as creating a mood board, mind map, alterations of sketches and storyboards etc.
Narrative Structure
As our second lecture, we have learned about the “Narrative Structure”. In this lecture, we have touched upon many topics such as the protagonist, antagonist, storyline and a lot of example short movies for us to understand it more vividly.
Our first topic was about the characters and how they reflect the audience. I have learned that characters need to reflect emotions to the audience rather than thinking about their own emotions throughout the story.
The Principles of Drama
Drama relies on two princliple rules;
There must be a character(protagonist) who will take action to achieve something
This character will meet with conflict
Also some other information about the “Drama Principles”;
Drama needs conflict, something for the main character to overcome
Drama needs characters who desire, who want, who need and who will act
Screen Vs Book Writing
There are some key information between screen and book writing techniques. These are;
In screen(cinematic) the information and the storyline should be described to the audience throughout the whole scenery. You have to think every possible way of reflecting the emotions and the scenarios to reflect the action. Cinematic is really hard to organize.
Theresa Chieci / The Balance(2019) A Day in The Life of a Screenwriter
While in book writing, the narrator could help to gain information to the audience which is easier compared to cinematic writing.
The protagonist is the main character within the story
They are the person who the film is following and focusing on
They normally have a motivation or a desire – a task to complete
They might need to learn something in order to proceed
Protagonist examples from the lecture video
Antagonist
The antagonist is the villain, or problem to be overcome
To stand between the protagonist and their main goal
The antagonist is not necessarily a person.
It is the thing or person the protagonist must vanquish in order to achieve their goal.
It could be a thing, a structure or even an attitude within the protagonist.
Antagonist examples from the lecture video
Character Design
As our next lecture, we have looked through the meaning of “Character Design” as well as other aspects of creating characters.
A character designer(or character artist) is a person who creates an entire concept, style, and artwork of a character from scratch. This aspect usually includes the depth of the character as well as the personality and the looks. Creating a character from scratch takes a lot of time to develop.
Character Design of The Incredibles / reference from the lecture video
Character Design of “Yoda” from Star Wars / reference from the lecture video
I got really happy while listening to this lecture video because creating characters from a small age has played an important role of finding my inner self. I really love to create characters from scratch. I believe it gives me a chance to depict what I feel and what I think. Since my childhood, I’ve been a dreamer. I loved to dream about fantasy and mythic stuff, which led me to create characters from that age. Now, my biggest dream is to improve my ability to create more creative characters in the future.
Model Sheet / Turnarounds
A “Model Sheet” gives you all of the information about the character, depicted on one or two sheets. It is essential for the animator and the storyboard artist to see the model sheet of the character, because it provides every aspect and information for them.
So, In order to provide every single information about the character for the animator and the storyboard artist, the character designer creates a “Turnaround” of the character. A Turnaround covers different angles(back, front, from sides) of the character, different poses etc.
Model Sheet and Turnarounds of “Mickey Mouse” / reference from the lecture videoModel sheet and Turnarounds of the character “Goofy” from Mickey Mouse / reference from the lecture video
Environment Design
Environment design covers every architectural design elements of the storyboard. This can include a labyrinth, a castle, a forest, a building etc. Planning the environments in this particular way creates an enormous help for the animators.
Environment design for the game “Monument Valley” / reference from the lecture videoMap design of “The Incredibles” / reference from the lecture video
Mind Map
As our first task, we have been asked to create a mind map according to our project topic, “Topsy Turvy”.
In my Mind Map, I have imagined about the term “Topsy Turvy” and its’ general meaning. While researching about the vocabulary, I have decided to focus more on the “upside-down” vocabulary. When researched for examples in this particular vocabulary, I have come up with “Alice In Wonderland”. I have been a serious fan of Alice In Wonderland back when I was a child. So, I have decided to take my main reference out of it. I have decided to compose my storyboard according to “upside-down” vocabulary and will take “Alice in Wonderland” as a reference.
My Mind Map of our project “Topsy Turvy”
Alice In Wonderland
Alice in Wonderland is a fiction book written by Lewis Caroll in 1865. The main protagonist is Alice and she teleports onto the wonderland after falling down from a rabbit hole. There are a lot of fictional characters like “The Mad Hatter, The Caterpillar, The Queen” and others. Despite the book, Alice in Wonderland also became a movie in 2010. The movie was directed by Tim Burton and the main actor was Johnny Depp. Personally, It is still one of my favourite movies. I remember nearly every scene from the movie because it was so mystical and the camera angles on each scene were fabulous.
Lewis Caroll(1865) Alice In Wonderland
Reference:
Gutenberg(2008), The Project Gutenberg eBook of Alice’s Adventures in Wonderland by Lewis Caroll, Available at: https://www.gutenberg.org/files/11/11-h/11-h.htm, (Accessed: 5th of November 2020)
Moodboard
As our next step, we have been asked to create a “Moodboard” about our project topic. Since I am taking “Alice In Wonderland” as my main reference, the plot is going to be something scary. So, In addition to this I have researched about spiders, scared people and forests. I have also paid attention on the colour scheme, which I have chosen images which are dark.
My Moodboard of the project “Topsy Turvy”
My Character Design
As for my main protagonist character, I have decided to create a 19 year old girl named “Mima“. She is an art student who lives in America. She lives alone in her flat room. She is mostly likely an introvert person, she usually play games and draw artworks rather than socializing.
Her appearance;
Curly hair
Green eyes
160 cm tall
Hazel hair colour
White skin tone
Things she like:
Eating sweets(such as chocolate, cakes, candy)
Sleeping
Respectful people
Drawing
Playing Games(she usually plays MOBA and RPG games)
Things she dislike:
Ignorant and selfish people
Spicy food
Insects
Unhygienic places
Doing homework
As for my designing process, I have first created the sketches of my designs in my sketchbook and then re-do them digitally using a drawing tablet. I have done the digital drawings on my computer using the program called “Paint Tool Sai”.
I have created three alternative designs for Mima, and decided that I’ll be using the first design. I thought that other two designs were not the right choice for her. I am really happy with how she turned.
Character design explorations of “Mima”Mima’s design explorations in digital
After I have decided on the first design of her, I have moved on to the next step before creating the whole design. I have created 6 different face expressions of Mima and imagined how she’ll react to stuff in the storyboard.
Face Expression sheet of MimaMima’s face expressions in digital
After I have done the face expressions, I have decided to create two different designs for her. The first one is her design in the forest, the second one is her design when she’s at home. In the forest, Mima wears clothing similar to a warrior. At house, she wears her pyjamas.
Mima’s full character design( in forest / at home)
Mima’s fnal designs in digital
After I have designed her clothes, I have moved on to the next step which is the turnarounds. It turned out really sketchy but I am still happy with it.
Mima’s turnaround sheet
Environment Design
After I was finished with Mima, I have decided to focus on the environment design. My story is going to take place in the forest, so I have decided to sketch a spooky forest which includes a witch house. The forest’s name is “Arcaela“.
Environment design sketch of “Arcaela” forestArcaela Forest in digital
Object Designs
As for my last step, I have decided to think more deeply about the objects in the “Arcaela Forest”. Since it’s a spooky environment, I have decided to create poisonous mushroom designs which named “Skima“. I have decided to choose the third design because I liked it the most.
My “Skima Mushroom” designsSkima mushroom designs in digital
Lastly, I have thought about the creatures in “Arcaela Forest”. As for my antagonist, I have decided to design a deadly spider which crawls upon the forest to kill outsiders. I have decided to choose the first design as I thought it is the scariest one out of all.
Designs of the “Arcaela Spider”Arcaela spider designs in digital
History of Storyboard
Storyboarding process is the main and the first stage before the production. Storyboard artists are mainly referred as “invisible artists” around the world. The way they are getting called by this particular name is because the art that they produce for the production is only visible for the animators and the production team, although each of them required an ultimate amount of strength and talent.
Storyboard of “The Lion King” by Disney / reference from the lecture video
The history of storyboarding touches upon the 1920s and is attributed to Georges-Jean Méliès. The first storyboard examples merged from comic-book-like “story sketches” at Disney studios for the creation of animated short cartoon subjects such as “Plane Crazy” and “Steamboat Willie”. After a few years later, this idea spread across other studios around the world.
Around 1933, the first storyboard example was merged in the “Walt Disney Studios” under the name “Three Little Pigs”.
According to Christopher Finch in The Art of Walt Disney (Abrams, 1974) Disney studios credited an animator called “Webb Smith” with creating the idea of drawing scenes on separate sheets of paper and pinning them up on a bulletin board to tell a story in sequence, thus creating the first storyboard. “Gone With the Wind“(1939) was the first live action film to be completely storyboarded.
After the first examples have emerged, storyboarding technique started to become popular around the early 1940’s. By this way, animation and film making has evolved in terms of production.
Storyboarding is an art form which is directly for planning the shots, the angles of the film or animation. It is also known as “invisible art” because no one can see it besides the production team.
Client Board: A client board is a storyboard with a purpose of selling the content, idea or a the general idea about the production. They are generally in full colour and look like the final outcome.
Client Board of “Indiana Jones” / reference from the lecture video
Shooting Board: A shooting board is a cheap way of gaining information about the storyboard. It is usually made in black and white and it includes more of the technical side of the production.
Shooting Board by the director Akira Kurosawa / reference from the lecture video
The Rule of Thirds: This particular technique called “The Rule of Thirds” is used both in photography and in cinematography. The rule of thirds involves mentally dividing up your image using 2 horizontal lines and 2 vertical lines, as shown below. You then position the important elements in your scene along those lines, or at the points where they meet.
There are types of different camera angles and shots for the animation / film. These different angles make the scene dramatic or excited, or a completely different feeling depending on the angle.
Establishing shot: An establishing shot is a shot at the head of a scene that clearly shows us the location of the action. This shot often follows an aerial shot and is used to show where everything will happen.
Extreme Long Shot: This particular shot is essential for the audience to get some knowledge about the environment. The shot frames the subject from a distance and focuses on its surroundings.
Full Shot: A Full shot does focus onto one thing such as the character etc. and focuses slowly to it. It gives information about where the action is going to take and what is going to happen next.
Medium Shot: A medium shot is captured from a distance to the object. It is mainly used for dialouge scenes and to depict body language as well as the setting itself.
Example of Medium Shot / reference from the lecture video
Medium Close up: A Medium Close up is the subject from just above their head down to about midway on their torso. The idea of a medium close-up shot is that you can still easily register the actor’s emotions and facial expressions while also retaining some of the background.
Example of Medium Close up / reference from the lecture video
My aim is to create a storyboard similar to “Alice In Wonderland”. I want to touch both “Utopia” and “Dystopia” vocabularies in my storyboard. I also want to compose my story as if the main protagonist teleports into a different world, and tries to escape from it. By getting inspired from my references, I have sketched scenes and plots for my storyboard. While I was sketching, I have decided that my story is going to contain a protagonist called ” Mima”, a 19-year-old art student who is living on her own.
In the 5 scenes, Mima is drawing a spooky landscape as her school project before going to bed. After she finishes it, she directly goes to bed and sleeps. A short while later, the computer screen starts to burst rays of light which contains a high dosage of power. This power then covers Mima’s whole body, making her float on the air. Seconds later, she instantly enters through the computer screen. In these moments, Mima is unaware of what’s happening and starts to scream through the teleportation portal.
My first storyboard template of “Mima’s Adventures in Arcaela”
When she arrives in the “Arcaela Forest“, her mind fills up with utter confusion. She recognizes that her clothes have also been changed from pyjamas to warrior clothes. After she gets up and starts to walk around the land, she sees a giant spider coming towards her. Then, she starts to run all the way down to the forest, trying to escape from the spider. At the right point, she shoots an arrow to the spider, leaving it damaged for a while. After Mima recognizes that the spider has taken several damage from the arrow, she runs at a fast pace and hides behind a tree.
After she takes a deep breath, she recognizes the weird-looking mushroom in front of her. The mushroom which Mima encounters is named “Skima Mushroom“, which is the magical mushroom located in the Arcaela Forest. Because the mushroom has an eye-cathcing magic which sends signals to a human’s brain, her mouth starts to get covered with saliva and her patience to eat the mushroom reduces to %0. After a while, without thinking about the consequences she suddenly takes a big bite from the mushroom. The moment she thinks that she is safe after eating the mushroom, she hears spider’s growls. She understands that she has no other chance to escape now as the spider is 3 times bigger than her.
My second storyboard template of “Mima’s Adventures in Arcaela”My third storyboard template of “Mima’s Adventures in Arcaela”
While the Arcaela Spider is trying to catch Mima, she suddenly disappears from the forest with the help of the Skima mushroom. The mushroom teleports her back to her room. When she comes back to her room, her clothes directly change from warrior suit to pyjamas but she is still in a sleeping position. The mushroom is also recognizable in her working desk as it teleported her. The end.
My fourth storyboard template of “Mima’s Adventures in Arcaela”
As for my storyboard, I have used “Master Shot, Medium Shot, Medium Close Up, Close Up, Long Shot.”
Logline and Synopsis
After I have decided upon my story and my storyboard, I have created a “Logline” and a “Synopsis” sentence to clarify it.
My Logline sentence: After being transported onto another world, Mima tries to escape while battling mysterious creatures.
My Synopsis sentence: Mima, a seemingly ordinary girl, transports onto another world.
Cuts and Transitions
Continuity and Screen Direction
This rule is highly important in making films, animations etc. becuase it is about the movement of the screen. For example, if the shot is happening on the right side of the frame, the next scene will have to start from the left frame. The scenes in transition needs to follow up with each other.
Example of the “Continuity and Screen Direction” with the character Link from Zelda / from the lecture video
Line of Action(180 Degree Rule)
This rule includes the movement of the camera, the angles or even where the actors stands and looking within the shot. The image above conveys the different rules that filmmakers choose to abide by.
Filmmakers which are applying this rule sets an imaginary axis onto the scene. By keeping the camera on one side of this imaginary axis, the characters maintain the same left/right relationship to each other, keeping the space of the scene orderly and easy to follow.
Example of the rule “Line of Action” / reference from the lecture video
Example of “180 Degree Rule” in the movie “Venom(2018)”
Soviet Montage Theory is a film movement that took place in Soviet Russia during the 1910’s, 20’s and into the early 30’s. It was founded by Lev Kuleshov while he was teaching at the Moscow Film School. According to prominent Soviet director Sergei Eisenstein, there are five different types within Soviet Montage Theory: Metric, Rhythmic, Tonal, Overtonal and Intellectual. The movement is widely known for changing the landscape of film editing around the world.
Sergei EisensteinAn example of Sergei Eisenstein’s directory / Battleship Potemkin(1925)
Metric Montage: Metric Montage is a method which the filmmaker needs to cut frame-by-frame shots in order to achieve it. Since the shots are always disturbed by the cuts, it gives the audience an anxious feeling about what is happening on the scene.
Example of “Metric Montage” / reference from the lecture videoExample of “Metric Montage” / reference from the lecture video
Rhythmic Montage: This method is equivalent to the term “harmony”. The reason of this is because the scenes combined with music creates a harmony between them. The music played across the scenes makes the flow and the transition onto the next scene.
Example 1 of the “Rhythmic Montage” from the movie Whiplash(2014)Example 2 of the “Rhythmic Montage” from the movie Whiplash(2014)Example 3 of the “Rhythmic Montage” from the movie Whiplash(2014)Example 4 of the “Rhythmic Montage” from the movie Whiplash(2014)
Tonal Montage: This particular method’s aim is to give emotions about the shots, so it is equivalent to a mood board. Tonal Montage uses combined emotional meaning through the shots and makes you ask “What does it feel like?”. For example, a shot of a newborn baby across the ocean view would make you feel calm and relaxed.
Example of “Tonal Montage” from the movie Baraka(1992) / reference from the lecture video
Intellectual Montage: This method is the reverse version of “Tonal Montage”. You are cutting together other objects to achieve a broader idea, broader theme, broader concept for your audience.
Example of “Intellectual Montage from a scene from the movie Naked Gun
References:
Youtube – Danielle Rich(2013) Naked Gun 2 and a 1/2 – Example of Intellectual Montage in Editing, Available at: https://www.youtube.com/watch?v=pDDYLU8SEm0 (Accessed: 2 December 2020)
Real time can be condensed into dramatic time using montage
Dramatic Time:
The most important thing when maintaining narrative clarity to not confuse the viewers or draw attention to the cuts and condensing time.
Different Cuts
Over The Shoulder: In this cut, filmmakers position the camera behind a character which is facing another, so by this way the shoulder and the back of one character is facing the audience.
Parallel – Axis Cut: This cut is similar to the “Over The Shoulder” in a way. The cut makes the characters looking and facing each other from a distance. By this way, the audience can feel what the character is feeling at that scene.
Match Cut: The match cut technique jumps from scene to scene by using a common element that connects the two scenes.
In this example, we got a character using car which has a watch and it has a round shape. Then, the camera zooms in to the watch and a new scene appears which the watch turns into wall clock.
Example of the “Match Cut” from the lecture video
Cut On The Look: This cut is equivalent to a “Reverse Shot”. The character in the scene looks behind and creates an eye contact with it.
Example of the “Cut On The Look” from the lecture video
L Cut: This cut requires different times within the audio around the visuals. So, the audio doesn’t cut around the same time as the visuals.
Jump Cut: Two sequential shots cut together where the angle or position can change only a very small amount and it gives you the effect or a feeling of jumping, the passing of time.
Example 1 of the “Jump Cut” from the movie The Royal Tenenbaums(2001)
Example 2 of the “Jump Cut” from the movie The Royal Tenenbaums(2001)
Example 3 of the “Jump Cut” from the movie The Royal Tenenbaums(2001)
Example 4 of the “Jump Cut” from the movie The Royal Tenenbaums(2001)
Nested Cut-Out: This cut can showcase information to the audience but gradually reveal it over time. It is usually used when the protagonist is in a bad situation and the cut reveals it in a anxious way to the audience.
Example 1 of the “Nested Cut Out” from the movie Pirates of the Caribbean: On Stranger Tides(2011) / reference from the lecture videoExample 2 of the “Nested Cut Out” from the movie Pirates of the Caribbean: On Stranger Tides(2011) / reference from the lecture videoExample 3 of the “Nested Cut Out” from the movie Pirates of the Caribbean: On Stranger Tides(2011) / reference from the lecture video
Nested Cut In: This particular cut is usually used to draw attention of something which is unpleasant. The audience which watches the scene usually feels discomfort and stress.
Example 1 of the “Nested Cut In” in the cartoon Cities of Gold(1982) reference from the lecture video
Example 2 of the “Nested Cut In” in the cartoon Cities of Gold(1982) reference from the lecture video
Example 3 of the “Nested Cut In” in the cartoon Cities of Gold(1982) reference from the lecture video
Cross Fade or Dessolve: This is a gradual transition from one image to another and it fades out to the next scene. It is similar to the “Jump Cut” but in a slower way.
Example 1 of the “Cross Fade/Dessolve” / reference from the lecture videoExample 2 of the “Cross Fade/Dessolve” / reference from the lecture videoExample 3 of the “Cross Fade/Dessolve” / reference from the lecture videoExample 4 of the “Cross Fade/Dessolve” / reference from the lecture video
Cross Fade Match Out: The filmmakers use this cut to reflect the soft & dreamy feeling through the shots. The shots’ transitions are usually very smooth.
Example 1 of the “Cross Fade Match Out” / reference from the lecture video
Example 2 of the “Cross Fade Match Out” / reference from the lecture video
Subliminal Shot: This cut uses a single shot to the scene and uses the subliminal language throughout the scene.
Example 1 of the “Subliminal Shot” / reference from the lecture video
Example 2 of the “Subliminal Shot” / reference from the lecture video
Example 3 of the “Subliminal Shot” / reference from the lecture video
Contrast Cut: This is where a cut is used to merge pose to different subjects.
Example of the “Contrast Cut” / reference from the lecture video
Parallel Editing / Cross Cutting: This cut is basically used when two different actions happening at the same time.
Foley sound takes its name from Jack Foley, a sound editor at Universal Studios.
Foley Sound is live action sound recreated in a studio using a variety of different everyday objects and surfaces.
The effects are recorded in the editing stage by foley artists using the moving images as guidance.
Important Facts about Foley
Foley sound makes a scene more realistic. Every moment of your day—even the silent moments—have sound. The most effective foley sounds are those that sound so natural and real that the audience does not notice them.
Foley sound makes a scene more immersive. Sound is a key element of storytelling. Sound effects create a sense of atmosphere and draw viewers more closely into the story.
More believable ambient sounds. Background and ambient sounds in a field recording are not usually loud enough to enhance the action on their own, so foley artists recreate them in the studio to be louder and more believable.
It’s too quiet without foley effects. Movies without background noise are too quiet—audiences think the sound in the theater has gone out. Foley sound fills that aural void and makes scenes feel more natural.
After I have watched the lecture video, I have moved on to the next step of my animatic. Since we need to have sounds for our frames in our animatic, I have decided to begin that process as quickly as possible. While watching the ” How does Foley Artists & Sound Designers work” video in our lecture, I was quite impressed by how the sound effects we hear in animations & film productions are made. After I have finished watching, I have directly thought about my animatic’s scenes. I have 2 different places in my animatic. One is Mima’s room and the other one is the “Arcaela Forest”.
First, I wanted to record sounds for the Arcaela Forest so I have went outside to my backyard. The main reason of this is because I was more curious about the sound potential for the Arcaela Forest scenes in my animatic. Since I don’t own a Foley, I have recorded everything through my phone. But because I wanted to create sound effects, I have searched for programs which has that utility. I have found one program called “Voice Changer”, which does has the possiblity to change simple recordings into different versions.
Different sound effects of the program “Voice Changer”
When I first got onto my backyard, I have first thought about the scenes where Mima runs from the Arcaela spider. So, I have recorded different running sounds. First one in on the leaves, the second one is the concrete and the last one is on the grass.
Leaves on my backyard
My footprints after running on the concrete
After I have finished recording the “running” sounds, I have moved on to record more. I have lurked around to see if there is anything possible for me to record as a sound. Then, I have decided to record the sounds of the branches. I have thought that it would be great for me to use it as an “arrow-shooting” sound. To make this sound, I have pulled the branch towards me and then leave it.
The branches which I have used
Moving on, the fallen leaves on the ground caught up my attention. I thought that I can make great sounds with crushing them between my hands. I thought that I could use these sounds at the scene where the spider recognizes Mima when she first arrives onto the forest.
Crushed leaves between my hands
For an alternative, I have also decided to record a sweeping sound which is similar to the “crushed leaves” sound.
Me sweeping the leaves
After I have recorded this sound, I have moved on to the next step which is about the sounds in Mima’s room. Since I will replicate the sounds in her room, there are fewer possibilities for me to record. But because Mima is drawing with her tablet in the first scenes, I have decided to record the “brushstroke” sounds from my tablet.
My drawing tablet
Moving on, I have decided to replicate the sound Mima “shutting the Pc down” by closing the top of my computer. By this way, I have got the actual sound of someone closing the computer.
My computer
Animatic Creation in Adobe Premier Pro
For the last stage of this project, it is time for me to transform what I have done so far into an animatic. For this process, I’ll be using the program “Adobe Premier Pro”. It is one of the best editing programs for creating short movies, animations etc. Before starting to my animatic, I was really calm because I knew the basic tools of Premier Pro.
For the first step, I have transferred each one of my storyboard frame into the program and put them into the right sequence. Next, I have uploaded the sounds which I have taken and put them into the right frame.
Process of my animatic in “Adobe Premier Pro”
After completing everything, I have exported my animatic into a 40 second video and uploaded it to Youtube.
Overall, I am really delighted to take part in this amazing animatic project as I had really fun experimenting and researching about designs, information about techniques etc.
Gutenberg(2008), The Project Gutenberg eBook of Alice’s Adventures in Wonderland by Lewis Caroll, Available at: https://www.gutenberg.org/files/11/11-h/11-h.htm, (Accessed: 5th of November 2020)
Youtube – Danielle Rich(2013) Naked Gun 2 and a 1/2 – Example of Intellectual Montage in Editing, Available at: https://www.youtube.com/watch?v=pDDYLU8SEm0 (Accessed: 2 December 2020)
What is Animation? We can refer anything which includes a motion, an animation. Traditional animation has been around for a while now(since the 1830s) but computer animation has been in our lives since the 1920s. There are several apps like Maya, Blender, Cinema 4D to create 3D animation. As our first term rotation, we will learn the basics of 3D Computer Animation and create our own world, under the project name “Polyworld”.
Before starting our project we have researched various images in order to create a mood board. I have researched about fantasy environments and magical creatures like dragons.
After I have completed my mood board, I have moved forward to the next step. The next step included drawing 6 rough sketches of our Poly World in different angles and perspectives. After settling my mind from the images through my mood board, I have decided to draw an environment which included big rocks, clouds and a hill.
First drawing of my world
Second drawing of my world
Third drawing of my world
Fourth drawing of my world
Fifth drawing of my world
Sixth drawing of my world
After I have finished my sketches, I have decided on an angle which I liked the most and rendered it in a more detailed way.
Rendered drawing from my world
For our “Poly World” project, we are going to use the program called “Blender”. In order for us to create a world, we first have to learn the basics. After finishing my drawings, I have started to watch the Blender tutorial from Moodle. Our aim in this tutorial was to sculpt a simple robot from scratch.
The program includes a lot of different buttons and hotkeys so it was really hard to understand at first glance. But after watching the tutorial several times I have managed to sculpt my robot.
My robot sculpture in Blender
I have tried to sculpt the robot by looking at the image which I have found from Pinterest.
Colour and Light are always in harmony together. One cannot be alive without the other. With our tutor Ben, we have learned about the general history of colour and types of colours which are real and digital.
In this lecture, I have learned that Isaac Newton has experimented with the prism by pointing it to the light in 1666, and found out that colours already existed in light. I was really amazed when I have read about this fact because I didn’t knew who invented this experiment.
Moving on, we have learned about the primary and secondary colours of digital & real life. Primary colours are;
Red
Green
Blue
In real life, our eye retinas have Rods and Cones for gaining information about what we see. Rods are responsible for brightness while Cones and responsible for colours. With the help of Cones, our brain is able to gain colour information. Our brain receptors can identify what colour are we seeing by the help of the primary colours.
Then we have learned about the Secondary colours;
Cyan
Magenta
Yellow
We can obtain these colours only with the help of the primary colours. For example;
Red + Green = Yellow
Red + Blue = Magenta
Green + Blue = Cyan
After I have learned about the colour and light theory, I have updated my rendered drawing and turned it into a fully coloured drawing instead of grayscale colours. This stage is really essential for our project because we are going to use this drawing for the main colours of our 3D landscape sculpture.
I wanted my landscape to look like a fantasy land. So I have coloured it the way a fantasy landscape would look like. I have also imagined that this landscape would have species like dragons and other fantasy creatures.
My fully coloured landscape drawing
After I have drawn this landscape, I have thought that this was a bit too much “cartoony” for my final render. So I have decided to give it another shot, but this time doing it in a more realistic way.
Because I have aimed it to be more “realistic”, I have added more details as well as mountains in the background. I am really proud of this drawing because I have finally created a nice landscape drawing in a realistic way.
My realistic landscape drawing
Advanced Modelling Techniques
After sculpting a simple robot model in Blender, we have learned about the advanced techniques. We have learned how to combine objects together, how to reform shapes etc. By these techniques, we then have started to sculpt our landscapes.
At my first try, I had a hard time sculpting the landscape which I have dreamed of. Since I haven’t used Blender a lot, I couldn’t manage to form the right objects together. So, my first try was a fail.
My first landscape try in Blender
Then, I have tried to sculpt it again since I have failed it in my first attempt. The next one is a bit better comparing to the first one, yet still not the best.
My second landscape try in Blender
After sculpting my second landscape, I have decided to check every single video on our “Advanced Modelling” task to achieve what I imagined this time.
The tasks covered plenty of new techniques and new shortcuts. It was really fun to create these “advanced” shapes.
My advanced structure model
My advanced structure model
My advanced structure model
I have started to sculpt my landscape right before I have finished watching the tutorials. My first attempt was not bad but not as good as I have wanted.
My first attempt of landscape sculpture after watching tutorials
My general sculpting skills have improved a bit, but I have failed in the main structure and it was looking like a mess. Also, I have had a serious problem with colour nodes, as I have forgotten to add layers on each of the objects so I couldn’t change the colours.
Then, on my second attempt, I believe I have nailed it this time. The structure looked pretty neat, just as I have imagined. The colours and the main structure all together looked pretty harmonical.
My second attempt of landscape sculpture after watching tutorials
For the last step, I have watched the final tutorials, which are about shadows and light. I have covered this up pretty easy and quickly, giving my landscape structure light from each spot. I have tried each light from each angle.
Light practice 1Light practice 2Light practice 3Light practice 4
After all of these tutorials which I have watched, I have seriously learned so much about the program Blender and about 3D Computer Modelling. These tutorials have challenged me in the first place but gained me confidence in my 3D Modelling skills.
3D Animation
As our last step in this rotation, we had the task to animate our landscapes. At first glance I thought that it would be something which will take hours to complete, but I was wrong. I have done a simple animation in my landscape, which I think it got out really cute. I really enjoyed working in this whole rotation as I got to try out something new, which is 3D Animation. I am really happy that I have got the chance to learn the basics of Blender.

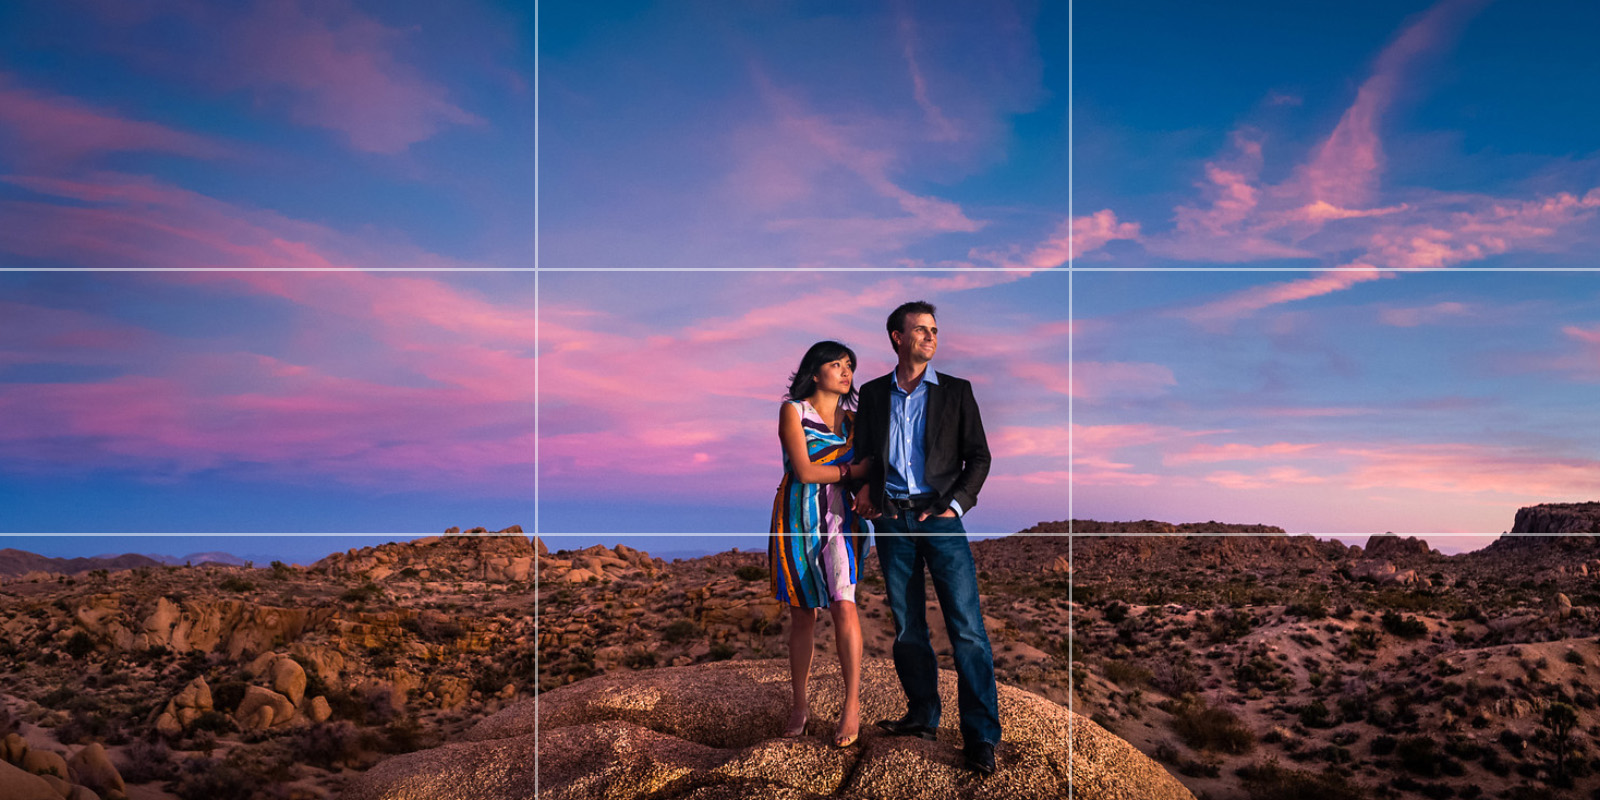
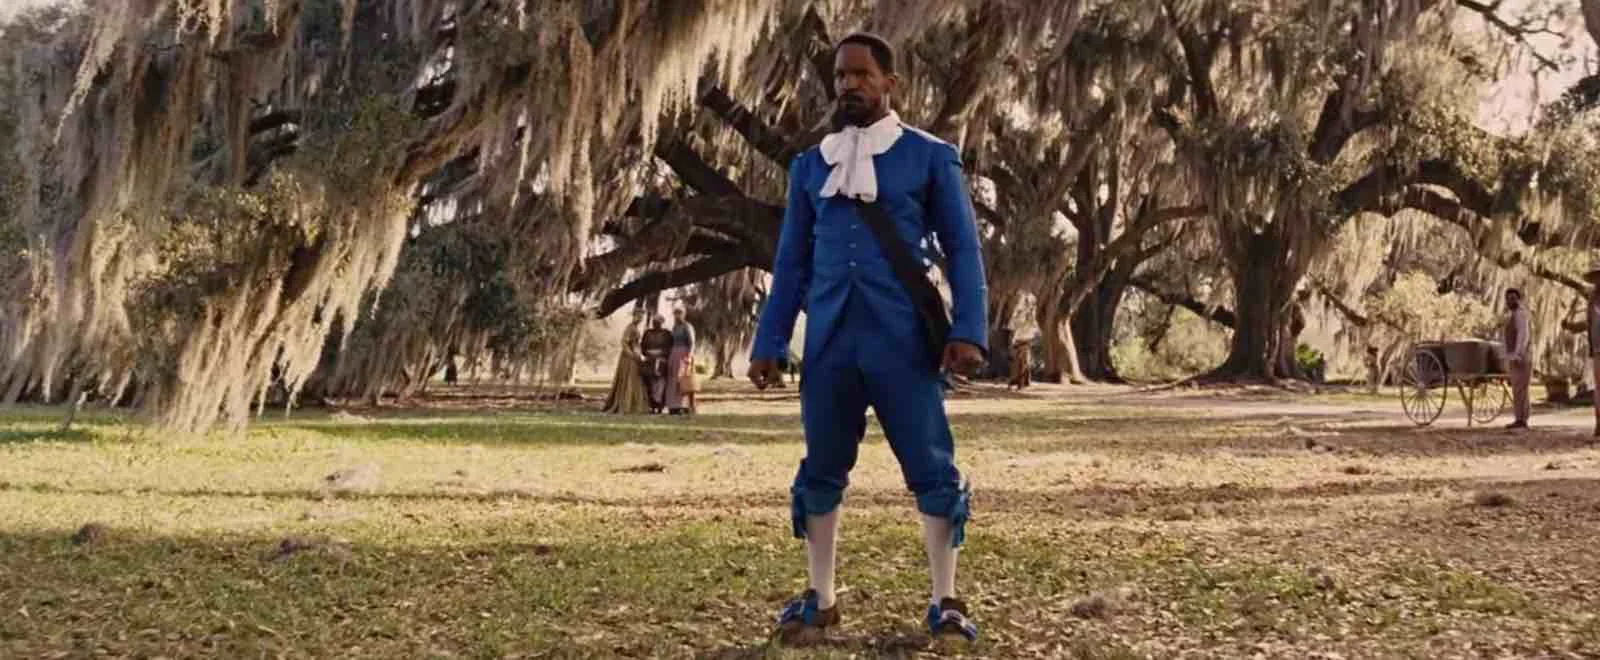