
As our first project this year, we have been asked to create a 40-second’ animation under the name “Topsy Turvy“. The meaning of “Topsy Turvy” can refer to many things such as; being confused, upside-down and disordered.
I am really excited about this upcoming project of ours because it will be something which I have never tried before. We have a load of tasks to accomplish; such as creating a mood board, mind map, alterations of sketches and storyboards etc.
Narrative Structure
As our second lecture, we have learned about the “Narrative Structure”. In this lecture, we have touched upon many topics such as the protagonist, antagonist, storyline and a lot of example short movies for us to understand it more vividly.
Our first topic was about the characters and how they reflect the audience. I have learned that characters need to reflect emotions to the audience rather than thinking about their own emotions throughout the story.
The Principles of Drama
Drama relies on two princliple rules;
- There must be a character(protagonist) who will take action to achieve something
- This character will meet with conflict
Also some other information about the “Drama Principles”;
- Drama needs conflict, something for the main character to overcome
- Drama needs characters who desire, who want, who need and who will act
Screen Vs Book Writing
There are some key information between screen and book writing techniques. These are;
- In screen(cinematic) the information and the storyline should be described to the audience throughout the whole scenery. You have to think every possible way of reflecting the emotions and the scenarios to reflect the action. Cinematic is really hard to organize.
- While in book writing, the narrator could help to gain information to the audience which is easier compared to cinematic writing.
References:
- The Balance(2019) What Does a Screenwriter do? Available at: https://www.thebalancecareers.com/screenwriter-screenwriting-as-a-career-1283468 (Accessed: 11th of Nov, 2020)
- The Writing Cooperative – Sriteja Reddy(2014) How to Start a Crime Thriller Novel? Available at: https://writingcooperative.com/how-to-start-a-crime-thriller-novel-47c11631ab2b (Accessed: 11th of Nov, 2020)
Protagonist
- The protagonist is the main character within the story
- They are the person who the film is following and focusing on
- They normally have a motivation or a desire – a task to complete
- They might need to learn something in order to proceed
Antagonist
- The antagonist is the villain, or problem to be overcome
- To stand between the protagonist and their main goal
- The antagonist is not necessarily a person.
- It is the thing or person the protagonist must vanquish in order to achieve their goal.
- It could be a thing, a structure or even an attitude within the protagonist.
Character Design
As our next lecture, we have looked through the meaning of “Character Design” as well as other aspects of creating characters.
A character designer(or character artist) is a person who creates an entire concept, style, and artwork of a character from scratch. This aspect usually includes the depth of the character as well as the personality and the looks. Creating a character from scratch takes a lot of time to develop.
Reference:
- Concept Art Empire, What is Character Design?(And what does a Character Designer Do?) Available at: https://conceptartempire.com/character-design/ (Accessed: 18th Nov 2020)
I got really happy while listening to this lecture video because creating characters from a small age has played an important role of finding my inner self. I really love to create characters from scratch. I believe it gives me a chance to depict what I feel and what I think. Since my childhood, I’ve been a dreamer. I loved to dream about fantasy and mythic stuff, which led me to create characters from that age. Now, my biggest dream is to improve my ability to create more creative characters in the future.
Model Sheet / Turnarounds
A “Model Sheet” gives you all of the information about the character, depicted on one or two sheets. It is essential for the animator and the storyboard artist to see the model sheet of the character, because it provides every aspect and information for them.
So, In order to provide every single information about the character for the animator and the storyboard artist, the character designer creates a “Turnaround” of the character. A Turnaround covers different angles(back, front, from sides) of the character, different poses etc.
Environment Design
Environment design covers every architectural design elements of the storyboard. This can include a labyrinth, a castle, a forest, a building etc. Planning the environments in this particular way creates an enormous help for the animators.
Mind Map
As our first task, we have been asked to create a mind map according to our project topic, “Topsy Turvy”.
In my Mind Map, I have imagined about the term “Topsy Turvy” and its’ general meaning. While researching about the vocabulary, I have decided to focus more on the “upside-down” vocabulary. When researched for examples in this particular vocabulary, I have come up with “Alice In Wonderland”. I have been a serious fan of Alice In Wonderland back when I was a child. So, I have decided to take my main reference out of it. I have decided to compose my storyboard according to “upside-down” vocabulary and will take “Alice in Wonderland” as a reference.
Alice In Wonderland
Alice in Wonderland is a fiction book written by Lewis Caroll in 1865. The main protagonist is Alice and she teleports onto the wonderland after falling down from a rabbit hole. There are a lot of fictional characters like “The Mad Hatter, The Caterpillar, The Queen” and others. Despite the book, Alice in Wonderland also became a movie in 2010. The movie was directed by Tim Burton and the main actor was Johnny Depp. Personally, It is still one of my favourite movies. I remember nearly every scene from the movie because it was so mystical and the camera angles on each scene were fabulous.
Reference:
- Gutenberg(2008), The Project Gutenberg eBook of Alice’s Adventures in Wonderland by Lewis Caroll, Available at: https://www.gutenberg.org/files/11/11-h/11-h.htm, (Accessed: 5th of November 2020)
Moodboard
As our next step, we have been asked to create a “Moodboard” about our project topic. Since I am taking “Alice In Wonderland” as my main reference, the plot is going to be something scary. So, In addition to this I have researched about spiders, scared people and forests. I have also paid attention on the colour scheme, which I have chosen images which are dark.
My Character Design
As for my main protagonist character, I have decided to create a 19 year old girl named “Mima“. She is an art student who lives in America. She lives alone in her flat room. She is mostly likely an introvert person, she usually play games and draw artworks rather than socializing.
Her appearance;
- Curly hair
- Green eyes
- 160 cm tall
- Hazel hair colour
- White skin tone
Things she like:
- Eating sweets(such as chocolate, cakes, candy)
- Sleeping
- Respectful people
- Drawing
- Playing Games(she usually plays MOBA and RPG games)
Things she dislike:
- Ignorant and selfish people
- Spicy food
- Insects
- Unhygienic places
- Doing homework
As for my designing process, I have first created the sketches of my designs in my sketchbook and then re-do them digitally using a drawing tablet. I have done the digital drawings on my computer using the program called “Paint Tool Sai”.
I have created three alternative designs for Mima, and decided that I’ll be using the first design. I thought that other two designs were not the right choice for her. I am really happy with how she turned.
After I have decided on the first design of her, I have moved on to the next step before creating the whole design. I have created 6 different face expressions of Mima and imagined how she’ll react to stuff in the storyboard.
After I have done the face expressions, I have decided to create two different designs for her. The first one is her design in the forest, the second one is her design when she’s at home. In the forest, Mima wears clothing similar to a warrior. At house, she wears her pyjamas.
After I have designed her clothes, I have moved on to the next step which is the turnarounds. It turned out really sketchy but I am still happy with it.
Environment Design
After I was finished with Mima, I have decided to focus on the environment design. My story is going to take place in the forest, so I have decided to sketch a spooky forest which includes a witch house. The forest’s name is “Arcaela“.
Object Designs
As for my last step, I have decided to think more deeply about the objects in the “Arcaela Forest”. Since it’s a spooky environment, I have decided to create poisonous mushroom designs which named “Skima“. I have decided to choose the third design because I liked it the most.
Lastly, I have thought about the creatures in “Arcaela Forest”. As for my antagonist, I have decided to design a deadly spider which crawls upon the forest to kill outsiders. I have decided to choose the first design as I thought it is the scariest one out of all.
History of Storyboard
Storyboarding process is the main and the first stage before the production. Storyboard artists are mainly referred as “invisible artists” around the world. The way they are getting called by this particular name is because the art that they produce for the production is only visible for the animators and the production team, although each of them required an ultimate amount of strength and talent.
The history of storyboarding touches upon the 1920s and is attributed to Georges-Jean Méliès. The first storyboard examples merged from comic-book-like “story sketches” at Disney studios for the creation of animated short cartoon subjects such as “Plane Crazy” and “Steamboat Willie”. After a few years later, this idea spread across other studios around the world.
Around 1933, the first storyboard example was merged in the “Walt Disney Studios” under the name “Three Little Pigs”.
According to Christopher Finch in The Art of Walt Disney (Abrams, 1974) Disney studios credited an animator called “Webb Smith” with creating the idea of drawing scenes on separate sheets of paper and pinning them up on a bulletin board to tell a story in sequence, thus creating the first storyboard. “Gone With the Wind“(1939) was the first live action film to be completely storyboarded.
After the first examples have emerged, storyboarding technique started to become popular around the early 1940’s. By this way, animation and film making has evolved in terms of production.
Reference:
- Openlab – Zbigniew Byzmek(2016) Origins of Storyboarding, Available at: https://openlab.citytech.cuny.edu/comd3523-fa2016/2016/11/07/origins-of-storyboarding/ (Accessed: 25th Nov 2020)
Details of Storyboarding
Storyboarding is an art form which is directly for planning the shots, the angles of the film or animation. It is also known as “invisible art” because no one can see it besides the production team.
Client Board: A client board is a storyboard with a purpose of selling the content, idea or a the general idea about the production. They are generally in full colour and look like the final outcome.
Shooting Board: A shooting board is a cheap way of gaining information about the storyboard. It is usually made in black and white and it includes more of the technical side of the production.
The Rule of Thirds: This particular technique called “The Rule of Thirds” is used both in photography and in cinematography. The rule of thirds involves mentally dividing up your image using 2 horizontal lines and 2 vertical lines, as shown below. You then position the important elements in your scene along those lines, or at the points where they meet.
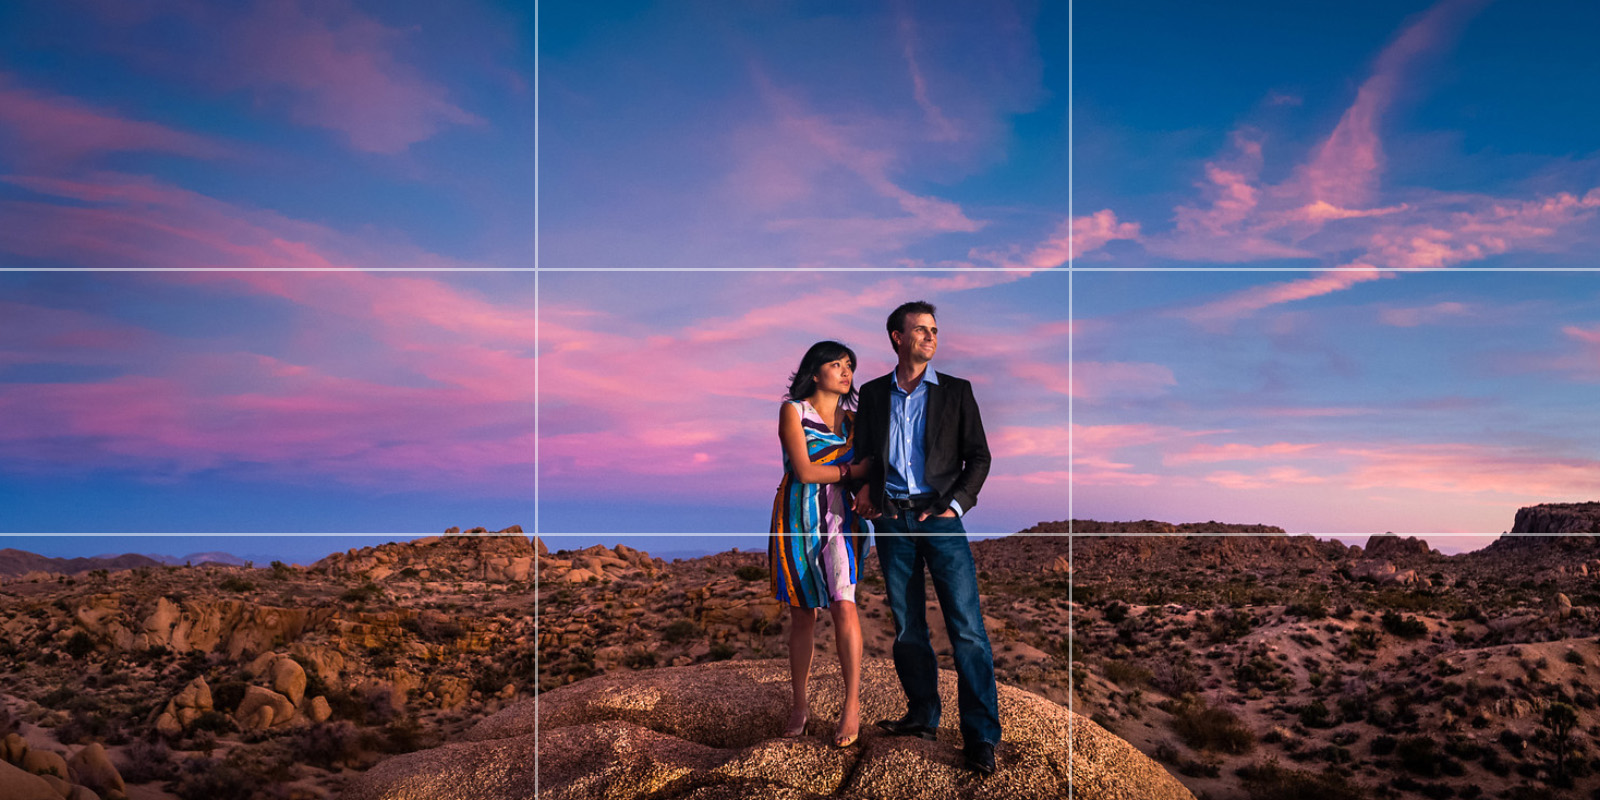
Reference:
- SLR Lounge(2017) What is The Rule of Thirds in Photography, Available at: https://www.slrlounge.com/glossary/rule-of-thirds-definition/ (Accessed: 25th Nov 2020)
Types of Shots
There are types of different camera angles and shots for the animation / film. These different angles make the scene dramatic or excited, or a completely different feeling depending on the angle.
Establishing shot: An establishing shot is a shot at the head of a scene that clearly shows us the location of the action. This shot often follows an aerial shot and is used to show where everything will happen.
Reference:
- StudioBinder, What Is an Establishing Shot?, Available at: https://www.studiobinder.com/blog/what-is-an-establishing-shot-definition-examples/ (Accessed: 25th Nov 2020)
Master shot: A master shot indicates where the action is going to occur and captures the necessary information about the upcoming scenes.
Reference:
- StudioBinder, The Master Shot – 5 Steps to Planning and Shooting a Complex Master, Available at: https://www.studiobinder.com/blog/directing-technique-complex-master-shot/ (Accessed: 25 Nov 2020)
Extreme Long Shot: This particular shot is essential for the audience to get some knowledge about the environment. The shot frames the subject from a distance and focuses on its surroundings.
Reference:
- StudioBinder, What’s and Extreme Long Shot? Framing Characters in a Location, Available at: https://www.studiobinder.com/blog/what-is-an-extreme-long-shot/ (Accessed: 25th Nov 2020)
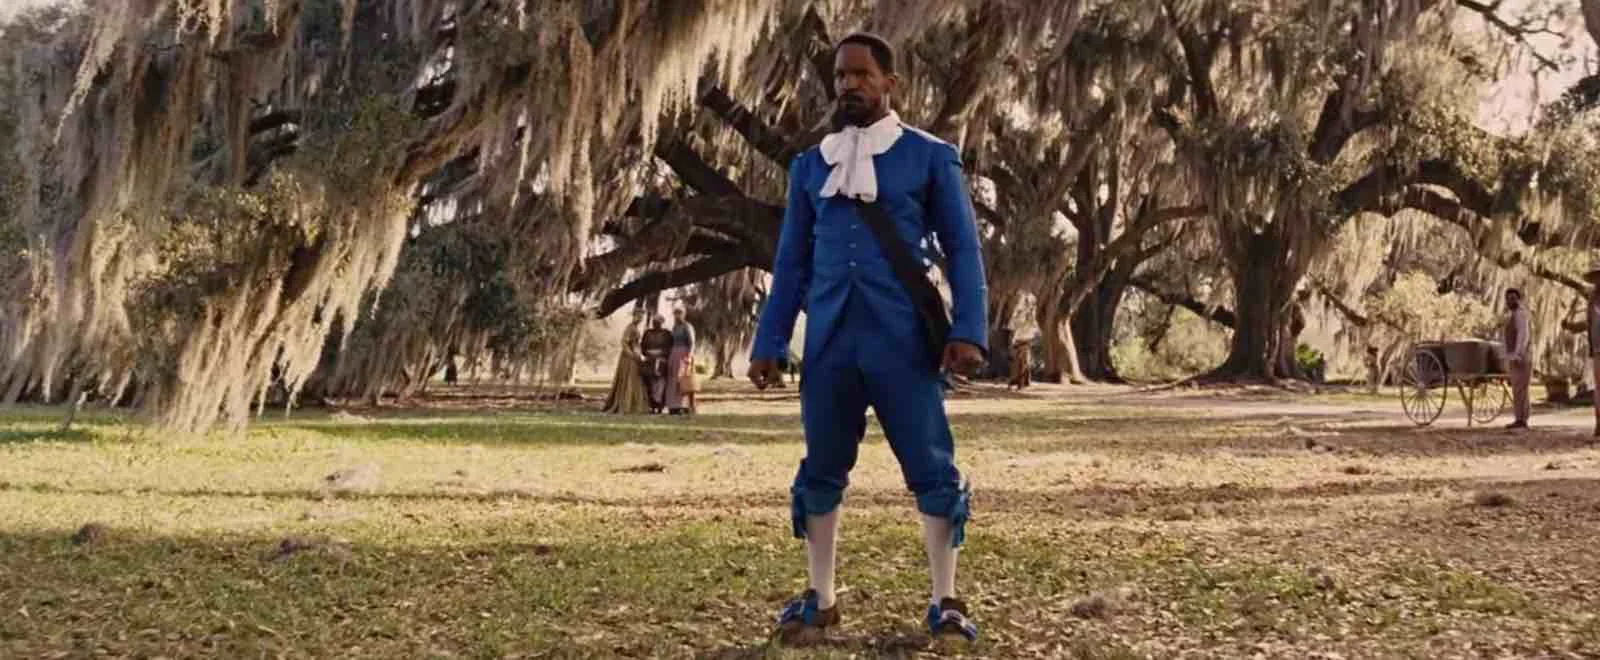
Full Shot: A Full shot does focus onto one thing such as the character etc. and focuses slowly to it. It gives information about where the action is going to take and what is going to happen next.
Reference:
- StudioBinder, The Ultimate Guide to Camera Shots (50+ Types of Shots and Angles in Film) Available at: https://www.studiobinder.com/blog/ultimate-guide-to-camera-shots/#FS (Accessed: 25th Nov 2020)
Medium Shot: A medium shot is captured from a distance to the object. It is mainly used for dialouge scenes and to depict body language as well as the setting itself.
Reference:
- StudioBinder, Medium Shots: Creative Examples of Camera Movements & Angles, Available at: https://www.studiobinder.com/blog/medium-shot-examples/, (Accessed: 25th Nov 2020)
Medium Close up: A Medium Close up is the subject from just above their head down to about midway on their torso. The idea of a medium close-up shot is that you can still easily register the actor’s emotions and facial expressions while also retaining some of the background.
Reference:
- StudioBinder, The Medium Close-Up Shot: Definition and Examples in Film, Available at: https://www.studiobinder.com/blog/medium-close-up-shot/ (Accessed: 25th Nov 2020)
Close Up: A close-up shot is a photograph or movie shot taken of a subject or object at close range intended to show greater detail to the viewer.
Reference:
- StudioBinder, Close-Up Shots: Examples of Camera Movement & Angles Available at: https://www.studiobinder.com/blog/close-up-shot/ (Accessed: 25th Nov 2020)
Mima’s Adventures in Arcaela Forest(The Story)
My aim is to create a storyboard similar to “Alice In Wonderland”. I want to touch both “Utopia” and “Dystopia” vocabularies in my storyboard. I also want to compose my story as if the main protagonist teleports into a different world, and tries to escape from it. By getting inspired from my references, I have sketched scenes and plots for my storyboard. While I was sketching, I have decided that my story is going to contain a protagonist called ” Mima”, a 19-year-old art student who is living on her own.
In the 5 scenes, Mima is drawing a spooky landscape as her school project before going to bed. After she finishes it, she directly goes to bed and sleeps. A short while later, the computer screen starts to burst rays of light which contains a high dosage of power. This power then covers Mima’s whole body, making her float on the air. Seconds later, she instantly enters through the computer screen. In these moments, Mima is unaware of what’s happening and starts to scream through the teleportation portal.
When she arrives in the “Arcaela Forest“, her mind fills up with utter confusion. She recognizes that her clothes have also been changed from pyjamas to warrior clothes. After she gets up and starts to walk around the land, she sees a giant spider coming towards her. Then, she starts to run all the way down to the forest, trying to escape from the spider. At the right point, she shoots an arrow to the spider, leaving it damaged for a while. After Mima recognizes that the spider has taken several damage from the arrow, she runs at a fast pace and hides behind a tree.
After she takes a deep breath, she recognizes the weird-looking mushroom in front of her. The mushroom which Mima encounters is named “Skima Mushroom“, which is the magical mushroom located in the Arcaela Forest. Because the mushroom has an eye-cathcing magic which sends signals to a human’s brain, her mouth starts to get covered with saliva and her patience to eat the mushroom reduces to %0. After a while, without thinking about the consequences she suddenly takes a big bite from the mushroom. The moment she thinks that she is safe after eating the mushroom, she hears spider’s growls. She understands that she has no other chance to escape now as the spider is 3 times bigger than her.
While the Arcaela Spider is trying to catch Mima, she suddenly disappears from the forest with the help of the Skima mushroom. The mushroom teleports her back to her room. When she comes back to her room, her clothes directly change from warrior suit to pyjamas but she is still in a sleeping position. The mushroom is also recognizable in her working desk as it teleported her. The end.
As for my storyboard, I have used “Master Shot, Medium Shot, Medium Close Up, Close Up, Long Shot.”
Logline and Synopsis
After I have decided upon my story and my storyboard, I have created a “Logline” and a “Synopsis” sentence to clarify it.
My Logline sentence: After being transported onto another world, Mima tries to escape while battling mysterious creatures.
My Synopsis sentence: Mima, a seemingly ordinary girl, transports onto another world.
Cuts and Transitions
Continuity and Screen Direction
This rule is highly important in making films, animations etc. becuase it is about the movement of the screen. For example, if the shot is happening on the right side of the frame, the next scene will have to start from the left frame. The scenes in transition needs to follow up with each other.
Line of Action(180 Degree Rule)
This rule includes the movement of the camera, the angles or even where the actors stands and looking within the shot. The image above conveys the different rules that filmmakers choose to abide by.
Filmmakers which are applying this rule sets an imaginary axis onto the scene. By keeping the camera on one side of this imaginary axis, the characters maintain the same left/right relationship to each other, keeping the space of the scene orderly and easy to follow.
Reference:
- StudioBinder – SC Lannom(2019) What is the 180 Degree Rule in Film? Crossing the Line with Purpose, Available at: https://www.studiobinder.com/blog/what-is-the-180-degree-rule-film/#what-is-180-degree-rule (Accessed: 2 December 2020)
Soviet Montage Theory
Soviet Montage Theory is a film movement that took place in Soviet Russia during the 1910’s, 20’s and into the early 30’s. It was founded by Lev Kuleshov while he was teaching at the Moscow Film School. According to prominent Soviet director Sergei Eisenstein, there are five different types within Soviet Montage Theory: Metric, Rhythmic, Tonal, Overtonal and Intellectual. The movement is widely known for changing the landscape of film editing around the world.
References:
- Empire – Willow Green(2016) Movie movements that defined cinema: Soviet Montage, Available at: https://www.empireonline.com/movies/features/soviet-montage-movie-era/ (Accessed: 2 December 2020)
- Movements In Film, Soviet Montage Films(1924 – 1933) Available at: https://www.movementsinfilm.com/blog/soviet-montage-films-1924-1933 (Accessed: 2 December 2020)
- StudioBinder – Chris Heckmann(2020) Soviet Montage Theory — Definition, Examples and Types of Montage, Available at: https://www.studiobinder.com/blog/soviet-montage-theory/ (Accessed: 2 December 2020)
Metric Montage: Metric Montage is a method which the filmmaker needs to cut frame-by-frame shots in order to achieve it. Since the shots are always disturbed by the cuts, it gives the audience an anxious feeling about what is happening on the scene.
Rhythmic Montage: This method is equivalent to the term “harmony”. The reason of this is because the scenes combined with music creates a harmony between them. The music played across the scenes makes the flow and the transition onto the next scene.
References:
- Youtube – AcademyAwardClips(2016) Whiplash Amazing Final Performance (Caravan) (Part 1) | Whiplash (2014) | 1080p HD, Available at: https://www.youtube.com/watch?v=ZZY-Ytrw2co&feature=emb_title (Accessed: 2 December 2020)
- StudioBinder – Chris Heckmann(2020) Soviet Montage Theory — Definition, Examples and Types of Montage , Available at: https://www.studiobinder.com/blog/soviet-montage-theory/ (Accessed: 2 December 2020)
Tonal Montage: This particular method’s aim is to give emotions about the shots, so it is equivalent to a mood board. Tonal Montage uses combined emotional meaning through the shots and makes you ask “What does it feel like?”. For example, a shot of a newborn baby across the ocean view would make you feel calm and relaxed.
Intellectual Montage: This method is the reverse version of “Tonal Montage”. You are cutting together other objects to achieve a broader idea, broader theme, broader concept for your audience.
References:
- Youtube – Danielle Rich(2013) Naked Gun 2 and a 1/2 – Example of Intellectual Montage in Editing, Available at: https://www.youtube.com/watch?v=pDDYLU8SEm0 (Accessed: 2 December 2020)
- StudioBinder – Chris Heckmann(2020) Soviet Montage Theory — Definition, Examples and Types of Montage , Available at: https://www.studiobinder.com/blog/soviet-montage-theory/ (Accessed: 2 December 2020)
Real Time vs Dramatic Time
Real time:
- It isn’t necessary to show everything
- Real time can be condensed into dramatic time using montage
Dramatic Time:
- The most important thing when maintaining narrative clarity to not confuse the viewers or draw attention to the cuts and condensing time.
Different Cuts
Over The Shoulder: In this cut, filmmakers position the camera behind a character which is facing another, so by this way the shoulder and the back of one character is facing the audience.
Reference: No Film School – Jason Hellerman(2019), What Is An Over the Shoulder Shot (OTS) & How Do You Use It?, Available at: https://nofilmschool.com/over-the-shoulder-shot-examples-definition (Accessed: 3 December 2020)
Parallel – Axis Cut: This cut is similar to the “Over The Shoulder” in a way. The cut makes the characters looking and facing each other from a distance. By this way, the audience can feel what the character is feeling at that scene.
Reference: Internet Archive(2016) Parallel-axis cut – Example 4, Available at: https://archive.org/details/parallel-axis-cut-example-4 (Accessed: 3 December 2020)
Cuts That Hides Themselves
Match Cut: The match cut technique jumps from scene to scene by using a common element that connects the two scenes.
In this example, we got a character using car which has a watch and it has a round shape. Then, the camera zooms in to the watch and a new scene appears which the watch turns into wall clock.
Cut On The Look: This cut is equivalent to a “Reverse Shot”. The character in the scene looks behind and creates an eye contact with it.
L Cut: This cut requires different times within the audio around the visuals. So, the audio doesn’t cut around the same time as the visuals.
Example of the “L Cut” : (Starts from 1:03) https://www.youtube.com/watch?v=eyH-a964kAs
Reference: Youtube – Fandor(2018) SFX Secrets: The J Cut & The L Cut, Available at: https://www.youtube.com/watch?v=eyH-a964kAs (Accessed: 3 December 2020)
Cuts That Draws Attention To Themselves
Jump Cut: Two sequential shots cut together where the angle or position can change only a very small amount and it gives you the effect or a feeling of jumping, the passing of time.
Reference: Youtube – Guillaume Mériaux(2010) The Royal Tenenbaums suicide scene, Available at: https://www.youtube.com/watch?v=b8dWtK4H7cE&feature=emb_title (Accessed: 3 December 2020)
Nested Cut-Out: This cut can showcase information to the audience but gradually reveal it over time. It is usually used when the protagonist is in a bad situation and the cut reveals it in a anxious way to the audience.
Nested Cut In: This particular cut is usually used to draw attention of something which is unpleasant. The audience which watches the scene usually feels discomfort and stress.
Cross Fade or Dessolve: This is a gradual transition from one image to another and it fades out to the next scene. It is similar to the “Jump Cut” but in a slower way.
Cross Fade Match Out: The filmmakers use this cut to reflect the soft & dreamy feeling through the shots. The shots’ transitions are usually very smooth.
Subliminal Shot: This cut uses a single shot to the scene and uses the subliminal language throughout the scene.
Contrast Cut: This is where a cut is used to merge pose to different subjects.
Parallel Editing / Cross Cutting: This cut is basically used when two different actions happening at the same time.
Reference: StudioBinder – SC Lannom(2020) What is Cross Cutting in Film — Definition and Examples of Parallel Editing, Available at: https://www.studiobinder.com/blog/cross-cutting-parallel-editing-definition/ (Accessed: 3 December 2020)
Sound Design and Foley
Sound
Sound is everything that can be heard in a scene. These examples are;
- Location Sound
- Musical Score / Soundtrack
- Dialogue
- Sound Effects
- Voiceover
- Absence of Sound
Music
There are different types of music usage in films, according to the genre of the film. These examples are;
- Determine the mood or genre of a film
- Build up or release tension
- Change the emotional or physical status of a character
- Smooth out transitions in edit – link scenes together
Sound Effects
- A sound effect is a recorded sound other than speech or music that is added to the soundtrack to enhance the narrative or make a creative statement.
- A person who records sound effects is called a foley artist or a sound designer
- Sound effects and background noises are integral in giving a sense of reality to the world depicted in a film.
- Sound effects can be used to increase mystery, suspense or disorientation for the viewer.
Foley
- Foley sound takes its name from Jack Foley, a sound editor at Universal Studios.
- Foley Sound is live action sound recreated in a studio using a variety of different everyday objects and surfaces.
- The effects are recorded in the editing stage by foley artists using the moving images as guidance.
Important Facts about Foley
- Foley sound makes a scene more realistic. Every moment of your day—even the silent moments—have sound. The most effective foley sounds are those that sound so natural and real that the audience does not notice them.
- Foley sound makes a scene more immersive. Sound is a key element of storytelling. Sound effects create a sense of atmosphere and draw viewers more closely into the story.
- More believable ambient sounds. Background and ambient sounds in a field recording are not usually loud enough to enhance the action on their own, so foley artists recreate them in the studio to be louder and more believable.
- It’s too quiet without foley effects. Movies without background noise are too quiet—audiences think the sound in the theater has gone out. Foley sound fills that aural void and makes scenes feel more natural.
References:
- Masterclass(2020) Film 101: Understanding Foley Sound and Why Foley Sound Is Important, Available at: https://www.masterclass.com/articles/film-101-understanding-foley-sound-and-why-foley-sound-is-important#what-is-foley-art (Accessed: 9 December 2020
- StudioBinder – Alyssa Maio April(2020) What is a Foley Artist? How They Bring Movies to Life, Available at: https://www.studiobinder.com/blog/what-is-a-foley-artist/ (Accessed: 9 December 2020)
Ambient Sound
- Every location has its own unique sound, even if you don’t notice it at first, this is known as ambient sound.
- You should record ambient sound in locations similar to those depicted in your animatic(or as close as you can find)
- If there is no ambient sound, the film will feel very empty.
Experimenting With Sound
After I have watched the lecture video, I have moved on to the next step of my animatic. Since we need to have sounds for our frames in our animatic, I have decided to begin that process as quickly as possible. While watching the ” How does Foley Artists & Sound Designers work” video in our lecture, I was quite impressed by how the sound effects we hear in animations & film productions are made. After I have finished watching, I have directly thought about my animatic’s scenes. I have 2 different places in my animatic. One is Mima’s room and the other one is the “Arcaela Forest”.
First, I wanted to record sounds for the Arcaela Forest so I have went outside to my backyard. The main reason of this is because I was more curious about the sound potential for the Arcaela Forest scenes in my animatic. Since I don’t own a Foley, I have recorded everything through my phone. But because I wanted to create sound effects, I have searched for programs which has that utility. I have found one program called “Voice Changer”, which does has the possiblity to change simple recordings into different versions.
When I first got onto my backyard, I have first thought about the scenes where Mima runs from the Arcaela spider. So, I have recorded different running sounds. First one in on the leaves, the second one is the concrete and the last one is on the grass.
After I have finished recording the “running” sounds, I have moved on to record more. I have lurked around to see if there is anything possible for me to record as a sound. Then, I have decided to record the sounds of the branches. I have thought that it would be great for me to use it as an “arrow-shooting” sound. To make this sound, I have pulled the branch towards me and then leave it.
Moving on, the fallen leaves on the ground caught up my attention. I thought that I can make great sounds with crushing them between my hands. I thought that I could use these sounds at the scene where the spider recognizes Mima when she first arrives onto the forest.
For an alternative, I have also decided to record a sweeping sound which is similar to the “crushed leaves” sound.
After I have recorded this sound, I have moved on to the next step which is about the sounds in Mima’s room. Since I will replicate the sounds in her room, there are fewer possibilities for me to record. But because Mima is drawing with her tablet in the first scenes, I have decided to record the “brushstroke” sounds from my tablet.
Moving on, I have decided to replicate the sound Mima “shutting the Pc down” by closing the top of my computer. By this way, I have got the actual sound of someone closing the computer.
Animatic Creation in Adobe Premier Pro
For the last stage of this project, it is time for me to transform what I have done so far into an animatic. For this process, I’ll be using the program “Adobe Premier Pro”. It is one of the best editing programs for creating short movies, animations etc. Before starting to my animatic, I was really calm because I knew the basic tools of Premier Pro.
For the first step, I have transferred each one of my storyboard frame into the program and put them into the right sequence. Next, I have uploaded the sounds which I have taken and put them into the right frame.
After completing everything, I have exported my animatic into a 40 second video and uploaded it to Youtube.
My animatic “Mima’s Adventures in Arcaela Forest” video: https://www.youtube.com/watch?v=XKR6nDVe0pA&feature=youtu.be
Overall, I am really delighted to take part in this amazing animatic project as I had really fun experimenting and researching about designs, information about techniques etc.
References
- Ambient Sound examples / https://jyotiarora.com/ambient-sounds/
- Baraka(1992)
- Concept Art Empire, What is Character Design?(And what does a Character Designer Do?) Available at: https://conceptartempire.com/character-design/ (Accessed: 18th Nov 2020)
- “Cross Cutting” in the movie Inception(2010) / https://www.studiobinder.com/blog/cross-cutting-parallel-editing-definition/
- Empire – Willow Green(2016) Movie movements that defined cinema: Soviet Montage, Available at: https://www.empireonline.com/movies/features/soviet-montage-movie-era/ (Accessed: 2 December 2020)
- Foley Artists / https://www.studiobinder.com/blog/what-is-a-foley-artist/
- Full Shot in Django Unchained / https://s.studiobinder.com/wp-content/uploads/2019/09/Camera-Shot-Guide-Full-Shot-2-Django-Unchained-StudioBinder.jpg.webp
- Gutenberg(2008), The Project Gutenberg eBook of Alice’s Adventures in Wonderland by Lewis Caroll, Available at: https://www.gutenberg.org/files/11/11-h/11-h.htm, (Accessed: 5th of November 2020)
- Internet Archive(2016) Parallel-axis cut – Example 4, Available at: https://archive.org/details/parallel-axis-cut-example-4 (Accessed: 3 December 2020)
- “L Cut” : (Starts from 1:03) https://www.youtube.com/watch?v=eyH-a964kAs
- Masterclass(2020) Film 101: Understanding Foley Sound and Why Foley Sound Is Important, Available at: https://www.masterclass.com/articles/film-101-understanding-foley-sound-and-why-foley-sound-is-important#what-is-foley-art (Accessed: 9 December 2020
- Moon Rise Kingdom(2012) / https://www.youtube.com/watch?v=ACN3dw-ywAU&feature=emb_title
- Movements In Film, Soviet Montage Films(1924 – 1933) Available at: https://www.movementsinfilm.com/blog/soviet-montage-films-1924-1933 (Accessed: 2 December 2020)
- “Nested Cut Out” from the movie Pirates of the Caribbean: On Stranger Tides(2011)
- “Nested Cut In” in the cartoon Cities of Gold(1982)
- No Film School – Jason Hellerman(2019), What Is An Over the Shoulder Shot (OTS) & How Do You Use It?, Available at: https://nofilmschool.com/over-the-shoulder-shot-examples-definition (Accessed: 3 December 2020)
- Openlab – Zbigniew Byzmek(2016) Origins of Storyboarding, Available at: https://openlab.citytech.cuny.edu/comd3523-fa2016/2016/11/07/origins-of-storyboarding/ (Accessed: 25th Nov 2020)
- “Over The Shoulder” shot in the movie Batman: The Dark Knight(2008) / https://nofilmschool.com/over-the-shoulder-shot-examples-definition
- “Parallel – Axis cut” from the movie Kill Bill Vol.1(2003) / https://archive.org/details/parallel-axis-cut-example-4
- The Balance(2019) What Does a Screenwriter do? Available at: https://www.thebalancecareers.com/screenwriter-screenwriting-as-a-career-1283468 (Accessed: 11th of Nov, 2020)
- The Writing Cooperative – Sriteja Reddy(2014) How to Start a Crime Thriller Novel? Available at: https://writingcooperative.com/how-to-start-a-crime-thriller-novel-47c11631ab2b (Accessed: 11th of Nov, 2020)
- Sound Waves / https://blog.medel.com/what-is-sound-what-is-noise/
- Sergei Eisenstein’s directory / Battleship Potemkin(1925)
- SLR Lounge(2017) What is The Rule of Thirds in Photography, Available at: https://www.slrlounge.com/glossary/rule-of-thirds-definition/ (Accessed: 25th Nov 2020)
- Storyboard of Three Little Pigs(1930) by Disney Studios / https://cartoonresearch.com/wp-content/uploads/2016/05/three-little-pigs-story-sketch-600.jpg
- StudioBinder – Alyssa Maio April(2020) What is a Foley Artist? How They Bring Movies to Life, Available at: https://www.studiobinder.com/blog/what-is-a-foley-artist/ (Accessed: 9 December 2020)
- StudioBinder – Chris Heckmann(2020) Soviet Montage Theory — Definition, Examples and Types of Montage, Available at: https://www.studiobinder.com/blog/soviet-montage-theory/ (Accessed: 2 December 2020)
- StudioBinder, Close-Up Shots: Examples of Camera Movement & Angles Available at: https://www.studiobinder.com/blog/close-up-shot/ (Accessed: 25th Nov 2020)
- StudioBinder, The Master Shot – 5 Steps to Planning and Shooting a Complex Master, Available at: https://www.studiobinder.com/blog/directing-technique-complex-master-shot/ (Accessed: 25 Nov 2020)
- StudioBinder, Medium Shots: Creative Examples of Camera Movements & Angles, Available at: https://www.studiobinder.com/blog/medium-shot-examples/, (Accessed: 25th Nov 2020)
- StudioBinder – SC Lannom(2020) What is Cross Cutting in Film — Definition and Examples of Parallel Editing, Available at: https://www.studiobinder.com/blog/cross-cutting-parallel-editing-definition/ (Accessed: 3 December 2020)
- StudioBinder – SC Lannom(2019) What is the 180 Degree Rule in Film? Crossing the Line with Purpose, Available at: https://www.studiobinder.com/blog/what-is-the-180-degree-rule-film/#what-is-180-degree-rule (Accessed: 2 December 2020)
- StudioBinder, The Medium Close-Up Shot: Definition and Examples in Film, Available at: https://www.studiobinder.com/blog/medium-close-up-shot/ (Accessed: 25th Nov 2020)
- StudioBinder, The Ultimate Guide to Camera Shots (50+ Types of Shots and Angles in Film) Available at: https://www.studiobinder.com/blog/ultimate-guide-to-camera-shots/#FS (Accessed: 25th Nov 2020)
- StudioBinder, What’s an Extreme Long Shot? Framing Characters in a Location, Available at: https://www.studiobinder.com/blog/what-is-an-extreme-long-shot/ (Accessed: 25th Nov 2020)
- StudioBinder, What Is an Establishing Shot?, Available at: https://www.studiobinder.com/blog/what-is-an-establishing-shot-definition-examples/ (Accessed: 25th Nov 2020)
- Youtube – Danielle Rich(2013) Naked Gun 2 and a 1/2 – Example of Intellectual Montage in Editing, Available at: https://www.youtube.com/watch?v=pDDYLU8SEm0 (Accessed: 2 December 2020)
- Youtube – Fandor(2018) SFX Secrets: The J Cut & The L Cut, Available at: https://www.youtube.com/watch?v=eyH-a964kAs (Accessed: 3 December 2020)
- Youtube – Guillaume Mériaux(2010) The Royal Tenenbaums suicide scene, Available at: https://www.youtube.com/watch?v=b8dWtK4H7cE&feature=emb_title (Accessed: 3 December 2020)
- Youtube – AcademyAwardClips(2016) Whiplash Amazing Final Performance (Caravan) (Part 1) | Whiplash (2014) | 1080p HD, Available at: https://www.youtube.com/watch?v=ZZY-Ytrw2co&feature=emb_title (Accessed: 2 December 2020)
Hi Lal, It’s good to see you’re so active and doing great work! Is it possible to set up your blog with a side menu so we can navigate the posts from the top? Looking good!
Hello Susi!
Thank you for your lovely comment. I have now customised my page, my posts should be separated now. =)